Mastering Windows Firewall: A Comprehensive Guide to Enabling and Disabling Firewall Protection in Windows XP
In today’s interconnected world, protecting your computer from unauthorized access and malicious threats is paramount. Windows XP offers users a built-in firewall solution known as Windows Firewall, designed to safeguard the system by monitoring and controlling incoming and outgoing network traffic. Enabling Windows Firewall provides an essential layer of defense against hackers, malware, and other security risks. However, there are instances where users may need to disable Windows Firewall temporarily, such as when troubleshooting network connectivity issues or installing certain applications. In this comprehensive guide, we’ll delve deep into the intricacies of enabling and disabling Windows Firewall in Windows XP, empowering users to manage their system’s security with confidence and precision.
Understanding Windows Firewall in Windows XP:
Before we explore the methods for enabling and disabling Windows Firewall, it’s essential to understand the role of this security feature within the Windows XP operating system. Windows Firewall is a software-based firewall solution that monitors and filters incoming and outgoing network traffic based on predefined rules and configurations. It serves as a barrier between the computer and external networks, protecting against unauthorized access, malicious software, and other security threats. By default, Windows Firewall is enabled in Windows XP, providing basic protection for the system. However, users have the flexibility to customize firewall settings and adjust security levels according to their preferences and requirements.
Step-by-Step Guide to Enabling Windows Firewall:
Now, let’s explore a systematic approach to enabling Windows Firewall in Windows XP:
Step 1: Accessing Windows Firewall Settings:
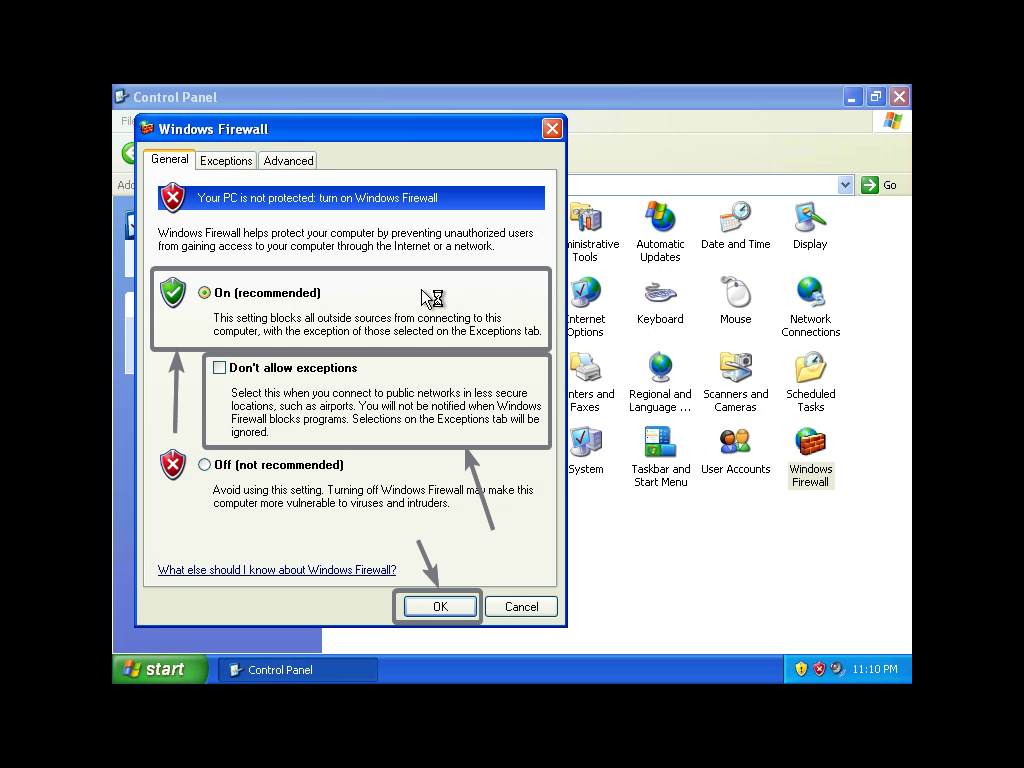
- Click on the “Start” button located at the bottom-left corner of the screen.
- Navigate to “Control Panel” and double-click to open it.
- In the Control Panel window, locate and open the “Windows Firewall” icon.
Step 2: Enabling Windows Firewall:
- In the Windows Firewall window, navigate to the “General” tab.
- Under the “General” tab, ensure that the option for “On (recommended)” is selected to enable Windows Firewall.
- Optionally, you can configure additional settings such as exceptions, logging, and notifications according to your preferences.
- Click “OK” to save the changes and enable Windows Firewall.
Step-by-Step Guide to Disabling Windows Firewall:
Now, let’s explore a systematic approach to disabling Windows Firewall in Windows XP:
Step 1: Accessing Windows Firewall Settings:
- Follow the same steps mentioned above to access the “Windows Firewall” icon in the Control Panel.
Step 2: Disabling Windows Firewall:
- In the Windows Firewall window, navigate to the “General” tab.
- Under the “General” tab, select the option for “Off (not recommended)” to disable Windows Firewall.
- You’ll receive a warning message indicating that turning off Windows Firewall may make your computer more vulnerable to network threats. Click “OK” to acknowledge the warning.
- Click “OK” again to save the changes and disable Windows Firewall.
Using Command-Line Interface (Optional):
For advanced users or those who prefer using command-line interfaces, Windows XP offers command-line utilities for managing Windows Firewall settings:
- netsh command: Users can use the “netsh” command-line utility to manage Windows Firewall settings, including enabling, disabling, and configuring firewall rules. Open a Command Prompt window and type “netsh firewall” followed by the desired command (e.g., “netsh firewall set opmode mode=ENABLE”).
Important Considerations:
Before enabling or disabling Windows Firewall, consider the following important considerations:
- Security Implications: Enabling Windows Firewall provides essential protection against network threats and unauthorized access. Disabling Windows Firewall temporarily may expose the system to security risks, so exercise caution and only disable it when necessary.
- Application Compatibility: Certain applications may require specific firewall configurations or exceptions to function properly. Before disabling Windows Firewall, ensure that you understand the implications for your installed applications and network connectivity.
- Regular Monitoring: Regardless of whether Windows Firewall is enabled or disabled, it’s essential to monitor network traffic and security logs regularly to detect and mitigate potential threats effectively.
Conclusion:
In conclusion, enabling and disabling Windows Firewall in Windows XP is a straightforward process that empowers users to manage their system’s security with confidence and precision. By following the step-by-step guide outlined in this article and considering important considerations, users can configure Windows Firewall settings according to their preferences and requirements effectively. Whether enabling Windows Firewall for enhanced security or temporarily disabling it for troubleshooting purposes, mastering the management of Windows Firewall ensures robust protection against network threats and unauthorized access on your Windows XP system. So take control of your system’s security today, enable or disable Windows Firewall as needed, and safeguard your digital assets with confidence.


