Mastering Visual Harmony: A Comprehensive Guide to Blending Objects in CorelDRAW

Introduction:
In the dynamic world of graphic design, the ability to seamlessly blend objects is a skill that adds a layer of sophistication and artistic flair to your creations. CorelDRAW, a leading graphic design software, provides designers with a robust set of tools for blending objects and creating smooth transitions between shapes, colors, and textures. This comprehensive guide will delve into the intricacies of blending objects in CorelDRAW, offering step-by-step instructions, advanced techniques, and practical tips to empower designers in their quest for visual excellence.
Understanding Object Blending:
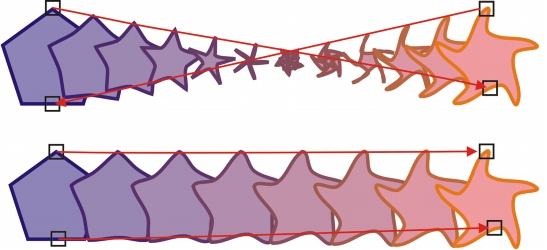
Object blending in CorelDRAW involves the smooth integration of two or more objects, creating a gradual transition between their attributes. This process enables designers to achieve various visual effects, from subtle color gradients to complex blends that seamlessly merge distinct shapes. By mastering object blending, designers can elevate their designs, adding depth, dimension, and a sense of continuity to their compositions.
Basic Steps for Blending Objects:
- Select the Objects: Begin by launching CorelDRAW and opening the document containing the objects you wish to blend. Select the objects by clicking and dragging the cursor over them or holding down the Shift key while clicking on each object individually.
- Access the Blend Tool: CorelDRAW’s Blend Tool, located in the toolbox, is the key to creating smooth object blends. Click on the Blend Tool icon to activate it, or use the shortcut key (Ctrl + B).
- Apply the Blend: With the Blend Tool activated, click on the first object in the sequence and then click on the second object. CorelDRAW will create a blend between the selected objects, interpolating their attributes based on the specified blending options.
- Adjust Blending Options: Fine-tune the blend by accessing the Blend Options in the Property Bar or the Object menu. Here, you can choose between different blending methods, adjust the steps between objects, and modify other parameters based on your design requirements.
- Explore Transparency Blends: For a more sophisticated effect, explore transparency blends. Adjusting the opacity and transparency properties of objects within the blend can create ethereal and captivating visual transitions.
Advanced Techniques for Object Blending:
- Custom Blending Paths: Take control of the blending path by creating a custom path for the objects to follow. Use the Pen Tool or other drawing tools to design a unique path, providing greater flexibility and precision in shaping the blend.
- Multi-Step Blends: Experiment with multi-step blends to create intricate transitions between multiple objects. CorelDRAW allows designers to specify the number of steps in the blend, offering fine control over the blending process.
- Color Blending and Harmony: Harness the power of color blending to create harmonious transitions between objects. Explore the Color Docker to manipulate the color scheme of objects within the blend, achieving visually pleasing and balanced results.
- Texture and Pattern Blends: Extend your creative boundaries by incorporating texture and pattern blends. Apply bitmap textures or vector patterns to objects within the blend, adding tactile and visual interest to your design.
- Interactive Blending: CorelDRAW’s interactive blending feature enables designers to make real-time adjustments to blends. Click on the Interactive Blend Tool, allowing dynamic modifications to the blend directly on the canvas for instant visual feedback.
Best Practices for Object Blending in CorelDRAW:
- Consistency in Object Types: Maintain consistency in the types of objects being blended. While CorelDRAW allows for versatile blending, a harmonious blend is often achieved when the objects share similar characteristics, such as shapes or colors.
- Experiment with Different Blending Methods: CorelDRAW offers various blending methods, including steps, smooth, and specified steps. Experiment with these methods to determine the most suitable option for achieving the desired blend effect in your design.
- Layer Organization: Keep your design workflow organized by placing objects and blends on separate layers. This facilitates efficient editing and allows you to isolate specific elements for adjustment without affecting the entire composition.
- Blend in Realistic Contexts: Consider the lighting conditions and perspective within your design. Blends that align with realistic lighting and spatial contexts enhance the overall visual credibility of your composition.
- Use Blending as a Design Element: Treat object blending as a deliberate design choice rather than a mere technical process. Intentional blending can evoke specific emotions, guide the viewer’s gaze, and contribute to the overall narrative of your design.
Conclusion:
Mastering the art of blending objects in CorelDRAW opens a world of creative possibilities for graphic designers. Whether you’re creating illustrations, logos, or complex compositions, the ability to seamlessly merge objects adds depth, sophistication, and a touch of artistry to your designs. By following the steps outlined in this comprehensive guide and exploring advanced techniques, designers can leverage CorelDRAW’s versatile tools to achieve visually stunning blends that captivate audiences. Object blending is not just a technical skill but a form of visual storytelling, allowing designers to create compositions that resonate with elegance and innovation. As you embark on your design journey, embrace the endless potential of object blending to elevate your creations and set your designs apart in the dynamic landscape of graphic design.


