Unveiling Artistic Brilliance: A Comprehensive Guide to Vector Mosaics and the Pointillizer Effect in CorelDRAW
Introduction:
Vector mosaics, often associated with the Pointillizer effect, represent a captivating fusion of precision and artistic expression within the realm of graphic design. CorelDRAW, a leading vector graphics software, empowers designers to transform their creations into intricate, visually stunning mosaics. This comprehensive guide aims to delve into the intricacies of creating vector mosaics using the Pointillizer effect in CorelDRAW. From understanding the basics to exploring advanced techniques, this tutorial seeks to equip designers with the knowledge and skills to embark on a creative journey where precision meets artistry.
Understanding Vector Mosaics and the Pointillizer Effect:
Vector mosaics, characterized by the use of tiny dots or points, offer a unique and captivating visual style. The Pointillizer effect in CorelDRAW allows designers to create these mosaics by converting objects or images into a series of precisely placed vector points. The result is a striking mosaic effect that adds depth, texture, and a sense of intricate detail to the design.
Basic Steps for Creating Vector Mosaics with Pointillizer:
- Import or Create the Base Object: Begin by importing or creating the base object that you wish to turn into a vector mosaic. This could be a simple shape, text, or even a more complex illustration.
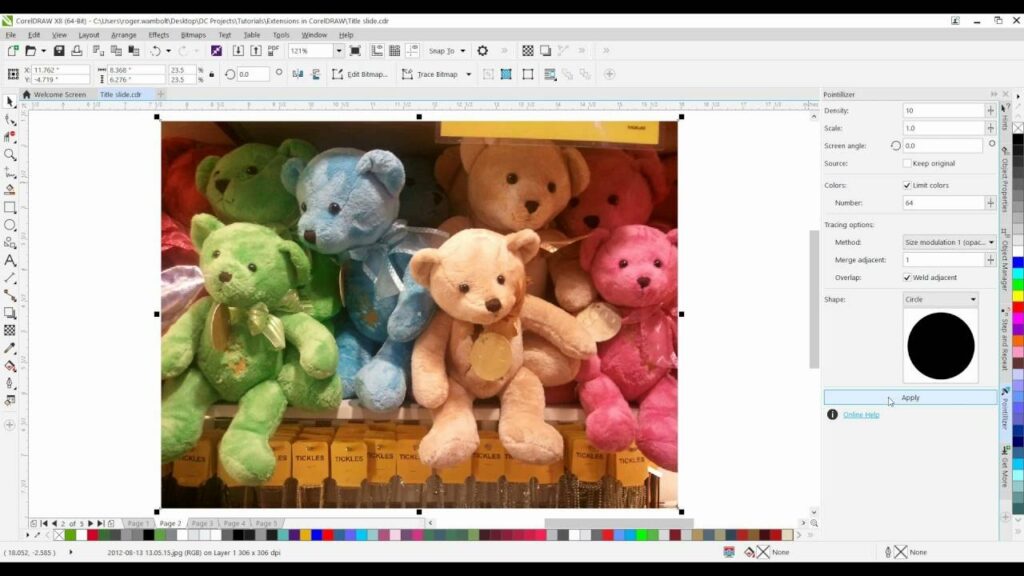
- Access the Pointillizer Effect: In CorelDRAW, access the Pointillizer effect by selecting the object and navigating to the Effects menu. From the Effects menu, choose Pointillize to open the Pointillizer dialog box.
- Adjust Pointillizer Settings: The Pointillizer dialog box provides a range of settings to customize the mosaic effect. Adjust parameters such as Point Density, Point Size, and Variation to achieve the desired level of detail and visual impact.
- Preview and Apply the Effect: Utilize the preview feature within the Pointillizer dialog box to see real-time changes based on your settings. Once satisfied, click “Apply” to transform the selected object into a vector mosaic.
- Fine-Tune the Result: After applying the Pointillizer effect, further fine-tune the result by adjusting settings or manually editing individual vector points using CorelDRAW’s powerful editing tools.
Advanced Techniques for Vector Mosaics:
- Color Variation and Gradient Mosaics: Experiment with color variation by incorporating gradients into your vector mosaic. CorelDRAW allows designers to apply gradients to the mosaic points, creating a dynamic and visually engaging effect.
- Layered Mosaics: Take vector mosaics to the next level by creating layered compositions. Apply the Pointillizer effect to multiple objects, each with its own settings, and arrange them strategically to build complex and visually rich mosaics.
- Combining Pointillizer with Other Effects: Explore the synergy of the Pointillizer effect with other CorelDRAW effects. Combine Pointillizer with transparency, shadows, or artistic media to achieve multi-dimensional and textured vector mosaics.
- Custom Shapes and Brushes: Break away from conventional shapes and experiment with custom shapes and brushes. CorelDRAW’s extensive library of brushes and the ability to create custom shapes provide endless possibilities for crafting unique and personalized vector mosaics.
- Incorporating Realistic Textures: Infuse realism into your vector mosaics by incorporating textures. Overlay textures on top of the Pointillizer effect to simulate materials such as canvas, paper, or fabric, adding a tactile dimension to your design.
Best Practices for Vector Mosaics in CorelDRAW:
- Maintain Consistency: Ensure consistency in the vector mosaic by maintaining uniformity in point size, density, and spacing. Consistency contributes to the overall visual harmony of the mosaic composition.
- Balance Detail and Simplicity: Strike a balance between intricate detail and simplicity based on your design goals. Consider the intended viewing distance and the overall aesthetic of your composition to achieve the desired visual impact.
- Experiment with Blend Modes: Explore CorelDRAW’s blend modes to enhance the integration of the vector mosaic with the background or surrounding elements. Blend modes offer creative ways to merge the mosaic seamlessly into the design.
- Optimize for Scale: Design vector mosaics with scalability in mind. Ensure that the mosaic retains its visual appeal and coherence when scaled to different sizes, especially if it is intended for various applications such as print and digital media.
- Create a Cohesive Color Palette: Establish a cohesive color palette for your vector mosaic. Consider the emotional impact of colors and aim for a harmonious blend that complements the overall design concept.
Conclusion:
Vector mosaics, enriched by the mesmerizing Pointillizer effect in CorelDRAW, represent a marriage of precision and creative expression. As designers embark on the journey of crafting intricate mosaics, they unlock a realm of visual possibilities that transcend traditional boundaries. By understanding the fundamental steps, exploring advanced techniques, and embracing best practices, designers can harness the full potential of vector mosaics to breathe life into their creations. CorelDRAW’s versatile tools, coupled with the artist’s vision, converge to transform simple objects into captivating works of art that resonate with both precision and artistic brilliance. As you embark on your exploration of vector mosaics, let this comprehensive guide serve as a roadmap to inspire your creativity and elevate your designs to new dimensions of visual storytelling.


