Mastering the Flow: A Comprehensive Guide to Using the Ripple Edit Tool in Final Cut Pro
Introduction: In the world of video editing, efficiency and precision are key to crafting polished and professional projects. The ripple edit tool in Final Cut Pro is a powerful feature that allows editors to make adjustments to their timelines quickly and seamlessly, while maintaining the integrity of their edits. Whether you’re trimming clips, rearranging sequences, or fine-tuning the pacing of your project, understanding how to leverage the ripple edit tool can significantly streamline your workflow and elevate the quality of your edits. In this comprehensive guide, we’ll delve into the intricacies of using the ripple edit tool in Final Cut Pro, covering techniques, workflows, and expert tips to help you master this essential editing tool and unleash your creativity with confidence.
Understanding the Ripple Edit Tool in Final Cut Pro: The ripple edit tool in Final Cut Pro is designed to make adjustments to the timing and duration of clips in your timeline while automatically adjusting adjacent clips to maintain the overall sequence continuity. Unlike traditional editing methods that require manual trimming and readjustment of clips, the ripple edit tool simplifies the process by automatically shifting subsequent clips to accommodate changes, thus preserving the flow and rhythm of your edit. Whether you’re shortening or extending clips, inserting new footage, or rearranging sequences, the ripple edit tool offers a dynamic and efficient way to make edits without disrupting the natural progression of your project. By mastering the ripple edit tool in Final Cut Pro, editors can achieve smoother transitions, tighter pacing, and more cohesive storytelling in their video projects.
Step-by-Step Guide to Using the Ripple Edit Tool in Final Cut Pro:
- Select the Ripple Edit Tool: To access the ripple edit tool in Final Cut Pro, first ensure that your timeline is open and active. Then, navigate to the toolbar at the top of the interface and locate the ripple edit tool icon. Alternatively, you can use the keyboard shortcut (B) to activate the ripple edit tool.
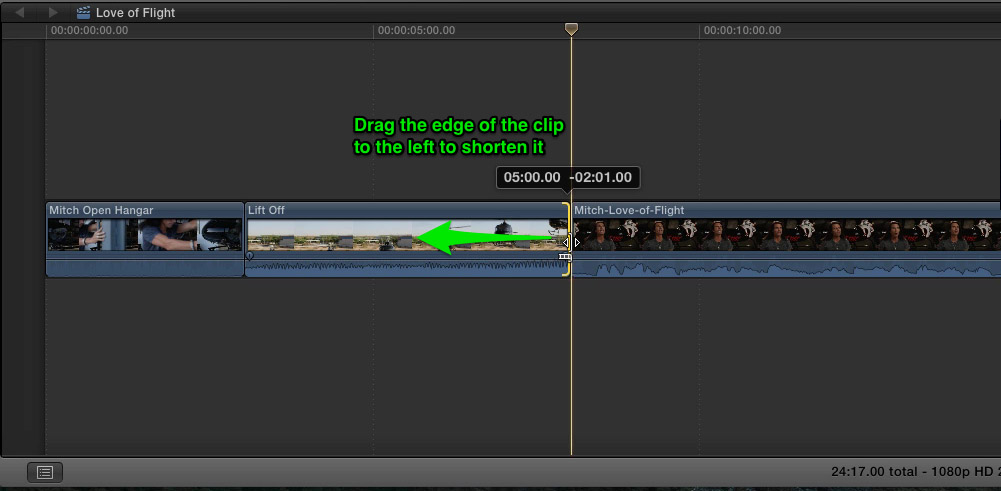
- Identify the Edit Point: Before making any edits with the ripple edit tool, identify the specific edit point in your timeline where you want to make adjustments. This could be the beginning or end of a clip, or any point within the timeline where you wish to insert or remove footage.
- Perform the Edit: With the ripple edit tool selected, position the cursor over the edit point in your timeline. Click and drag the edit point to the left or right to shorten or extend the duration of the clip. As you drag, notice how adjacent clips automatically shift to accommodate the changes, maintaining the overall sequence continuity.
- Fine-Tune the Edit: After performing the initial edit with the ripple edit tool, fine-tune the placement and timing of the adjacent clips as needed. Use the magnetic timeline feature in Final Cut Pro to snap clips into place and ensure precise alignment between edit points. Zoom in on the timeline for more detailed adjustments, if necessary.
- Review the Edit: Once you’ve made the desired adjustments using the ripple edit tool, review the edit in the timeline to assess its impact on the overall sequence. Scrub through the timeline or play back the sequence to ensure that the pacing, timing, and continuity of the edit remain intact. Make any additional adjustments or refinements as needed.
- Apply Ripple Trim to Multiple Clips (optional): In addition to editing individual clips, you can also apply ripple trim to multiple clips simultaneously in Final Cut Pro. Select multiple clips in the timeline by clicking and dragging to create a selection range, then use the ripple edit tool to trim the selection range as desired. This allows you to make edits across multiple clips while maintaining synchronization and sequence continuity.
- Undo and Redo Edits: If you’re not satisfied with the results of your edit, or if you make a mistake while using the ripple edit tool, you can easily undo or redo your actions in Final Cut Pro. Use the keyboard shortcuts (Command + Z) to undo edits or (Shift + Command + Z) to redo edits, or navigate to the Edit menu and select the corresponding options.
- Save Your Project: Once you’re satisfied with the edits made using the ripple edit tool, be sure to save your project to preserve your changes and prevent any potential data loss. Go to the File menu and select Save, or use the keyboard shortcut (Command + S) to save your project file.
Tips and Best Practices for Using the Ripple Edit Tool in Final Cut Pro:
- Plan Your Edits in Advance: Before using the ripple edit tool, take the time to plan and storyboard your edits in advance. Identify the specific points in your timeline where adjustments are needed and determine the desired outcome of each edit. This will help you work more efficiently and avoid unnecessary revisions later on.
- Use Keyboard Shortcuts: Familiarize yourself with keyboard shortcuts for activating the ripple edit tool and performing common editing tasks in Final Cut Pro. This will help you work faster and more fluidly, allowing you to focus on the creative aspects of your edit rather than navigating menus and toolbars.
- Utilize Snapping and Magnetic Timeline: Take advantage of Final Cut Pro’s snapping and magnetic timeline features to ensure precise alignment and synchronization between clips when using the ripple edit tool. Snapping helps clips snap into place when dragging them in the timeline, while the magnetic timeline automatically adjusts surrounding clips to maintain sequence continuity.
- Work Non-Destructively: When making edits with the ripple edit tool, work non-destructively whenever possible by keeping backups of your project files and using adjustment layers or nested sequences to preserve your original footage. This allows you to experiment with different edits and revert to previous versions if needed without compromising your project’s integrity.
- Preview and Test Edits: Before finalizing your edits made with the ripple edit tool, preview and test them in the timeline to ensure that they achieve the desired effect and maintain the flow and pacing of your project. Scrub through the timeline, play back the sequence, and solicit feedback from colleagues or clients to validate your edits.
- Practice and Experiment: Like any editing technique, mastering the ripple edit tool in Final Cut Pro requires practice and experimentation. Take the time to explore its capabilities, experiment with different edit points and adjustments, and challenge yourself to think creatively about how to use the tool to achieve your desired results.
Conclusion: The ripple edit tool in Final Cut Pro is a versatile and powerful feature that empowers editors to make adjustments to their timelines quickly and efficiently, while maintaining the integrity of their edits. By following the steps outlined in this comprehensive guide and embracing best practices, you’ll be well-equipped to leverage the ripple edit tool to streamline your workflow, enhance the pacing and continuity of your projects, and unleash your creativity with confidence. So, dive in, experiment fearlessly, and let the ripple edit tool propel your editing skills to new heights in Final Cut Pro.


