Mastering Precision: A Comprehensive Guide on Applying Auto Image Commands as Adjustment Layers in Photoshop

Introduction:
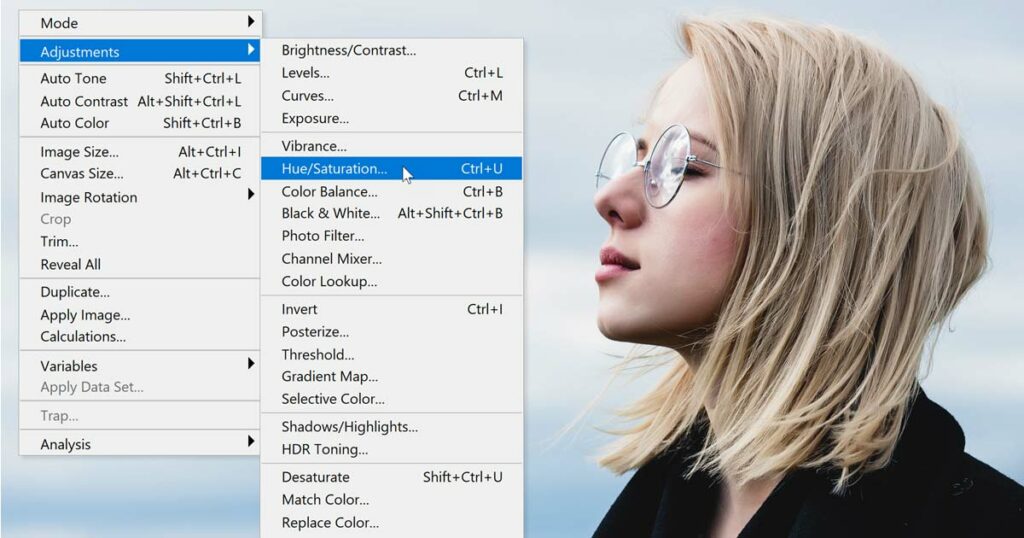
Adobe Photoshop stands as a cornerstone in the world of image editing, offering a myriad of tools and features that empower users to enhance and transform their photographs. Among these tools are the Auto Image Commands – Auto Tone, Auto Contrast, and Auto Color – which provide automated adjustments to improve the overall tonal balance, contrast, and color balance in an image. To elevate the precision and non-destructive nature of these adjustments, Photoshop allows users to apply the Auto Image Commands as Adjustment Layers. In this extensive guide, we will explore the step-by-step process of utilizing Adjustment Layers for Auto Tone, Auto Contrast, and Auto Color, unlocking a more refined and flexible approach to image enhancement.
Understanding Auto Image Commands:
- Auto Tone:
- Auto Tone adjusts the tonal range of an image, optimizing brightness and contrast. It ensures a balanced distribution of highlights, shadows, and midtones, serving as a foundational step for exposure correction.
- Auto Contrast:
- Auto Contrast enhances the overall contrast in an image by stretching the tonal range between the lightest and darkest pixels. This automated adjustment aims to provide a more dynamic and visually appealing contrast.
- Auto Color:
- Auto Color corrects color balance by analyzing and adjusting the overall distribution of colors in an image. It is particularly useful for eliminating color casts and ensuring a neutral and realistic color representation.
Advantages of Using Adjustment Layers:
- Non-Destructive Editing:
- Applying Auto Image Commands as Adjustment Layers ensures non-destructive editing. The original image data remains untouched, and adjustments are made on separate layers, allowing for easy toggling, modification, and fine-tuning.
- Selective Application:
- Adjustment Layers enable selective application of Auto Image Commands to specific areas of an image. Masks can be employed to target adjustments, ensuring that enhancements are applied only where needed.
- Layer Opacity and Blending Modes:
- Adjustment Layers offer control over the opacity and blending modes, allowing users to fine-tune the intensity of Auto Tone, Auto Contrast, or Auto Color. Experimenting with different blending modes can yield creative results and enhance the overall visual impact.
Step-by-Step Guide:
Applying Auto Tone as an Adjustment Layer:
- Open Your Image:
- Launch Photoshop and open the image you want to enhance.
- Create a New Adjustment Layer:
- Click on the “New Adjustment Layer” icon at the bottom of the Layers panel and choose “Levels.”
- Access Auto Tone:
- In the Levels adjustment layer properties, locate the Auto options at the bottom.
- Apply Auto Tone:
- Click on the “Auto” button, and Photoshop will automatically adjust the tonal range based on the image’s content.
- Fine-Tune if Necessary:
- Use the sliders in the Levels properties to fine-tune the adjustment if needed. The original image data remains intact.
Applying Auto Contrast and Auto Color as Adjustment Layers:
- Create New Adjustment Layer:
- Repeat the process of creating a new adjustment layer, but this time choose “Brightness/Contrast” for Auto Contrast and “Curves” for Auto Color.
- Auto Contrast:
- In the Brightness/Contrast adjustment layer properties, check the “Use Legacy” option to access the Auto Contrast button.
- Auto Color:
- In the Curves adjustment layer properties, click on the Auto options and choose “Enhance Per Channel Contrast” for Auto Color.
- Fine-Tune and Experiment:
- As with Auto Tone, fine-tune the adjustments using the available sliders. Experiment with opacity, blending modes, and masks for selective application.
Tips for Optimal Results:
- Adjustment Layer Grouping:
- Consider grouping Auto Tone, Auto Contrast, and Auto Color adjustment layers together for a more organized workspace. Right-click on the layers and choose “Group from Layers.”
- Monitor Color Profiles:
- Ensure that your monitor is calibrated and uses a consistent color profile to accurately assess the results of Auto Color adjustments.
- Combine with Manual Adjustments:
- To achieve precise control, combine Auto Image Commands with manual adjustments using tools like Curves, Levels, and Color Balance for a tailored approach.
- Utilize Layer Masks:
- Leverage layer masks to selectively apply adjustments. Use a soft brush to reveal or conceal specific areas of the image.
Conclusion:
By applying Auto Image Commands as Adjustment Layers in Photoshop, users gain unparalleled control over their image enhancement process. The non-destructive nature of Adjustment Layers ensures flexibility and precision, allowing for seamless experimentation and refinement. Whether used individually or in combination, Auto Tone, Auto Contrast, and Auto Color Adjustment Layers provide a sophisticated approach to elevating the visual appeal of photographs while maintaining the integrity of the original image data. This comprehensive guide equips users with the knowledge and techniques needed to harness the full potential of Auto Image Commands within the versatile framework of Adjustment Layers, unlocking a world of creative possibilities in the realm of image editing.


