Mastering Motion Blur: A Comprehensive Guide on How to Use the Motion Blur Effect in Final Cut Pro
Introduction: Motion blur is a visual effect used in film and video production to simulate the natural blurring of moving objects. It adds a sense of realism, speed, and fluidity to motion graphics, animations, and fast-paced scenes. Final Cut Pro, a popular video editing software, offers a versatile motion blur effect that allows users to enhance the visual quality of their projects. In this comprehensive guide, we will explore the step-by-step process of using the motion blur effect in Final Cut Pro, from applying motion blur to adjusting settings and optimizing the effect for professional-quality output.
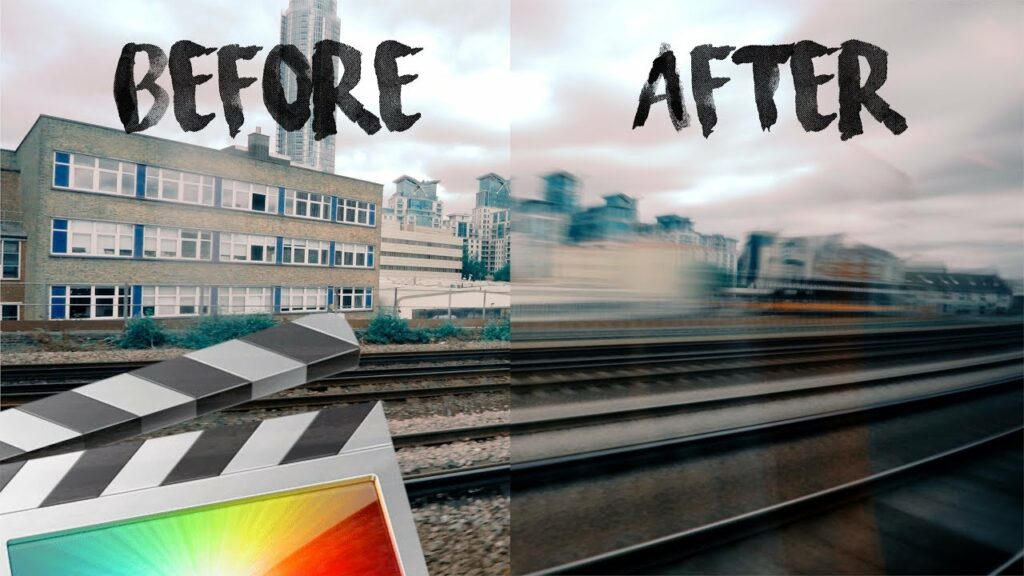
Understanding Motion Blur: Motion blur occurs when a moving object is captured by a camera or displayed on a screen over a certain period of time. It results from the natural motion of the object combined with the exposure time of the camera or the frame rate of the video. In film and video production, motion blur is used to create a sense of motion and speed, making moving objects appear more dynamic and lifelike. Final Cut Pro’s motion blur effect allows users to add realistic motion blur to their video projects, enhancing the visual quality and realism of motion graphics, animations, and action sequences.
Step 1: Importing Footage Begin by launching Final Cut Pro and creating a new project. Import the footage you want to apply motion blur to into the project by clicking on the Import button in the browser panel and selecting the desired files from your computer. Alternatively, you can drag and drop the footage directly into the timeline in the editor panel to add it to the project.
Step 2: Applying the Motion Blur Effect With the footage added to the timeline, navigate to the Effects browser panel and search for the Motion Blur effect. Click and drag the Motion Blur effect onto the clip or clips you want to apply motion blur to in the timeline. Final Cut Pro will apply the motion blur effect to the selected clips, adding a subtle blur to moving objects in the footage.
Step 3: Adjusting the Motion Blur Settings After applying the motion blur effect, you can adjust the settings to customize the appearance and intensity of the blur. Select the clip with the motion blur effect applied in the timeline, then navigate to the Video inspector panel in the top-right corner of the interface. Here, you will find a section labeled Motion Blur with various controls and settings that can be adjusted to fine-tune the motion blur effect.
Step 4: Adjusting the Shutter Angle One of the key settings in the Motion Blur effect is the Shutter Angle, which determines the angle of the virtual shutter used to capture motion blur. Increasing the shutter angle will result in a more pronounced motion blur effect, while decreasing the shutter angle will reduce the amount of blur. Experiment with different shutter angle values to achieve the desired level of motion blur for your footage.
Step 5: Adjusting the Motion Blur Samples Another important setting in the Motion Blur effect is the Motion Blur Samples, which determines the number of samples used to calculate the motion blur. Increasing the motion blur samples will result in a smoother and more accurate blur, especially for fast-moving objects. However, higher sample values may increase rendering time and system resources. Find a balance between sample quality and performance that works best for your project.
Step 6: Previewing and Fine-Tuning the Effect After adjusting the motion blur settings, preview the effect in the viewer panel to assess the appearance and quality of the motion blur. Make any necessary adjustments or refinements to the settings based on your preferences and the specific requirements of your project. Continuously iterate and refine the effect until you achieve the desired look and feel for the motion blur.
Step 7: Optimizing the Motion Blur Effect Once you are satisfied with the motion blur effect, optimize it for smooth playback and rendering in Final Cut Pro. Consider adjusting the playback quality settings, rendering settings, and cache settings to ensure optimal performance and efficiency. Preview the final result in the viewer panel to confirm that the motion blur effect is applied correctly and looks as expected.
Step 8: Exporting the Final Result After applying and optimizing the motion blur effect, export the final result from Final Cut Pro to share or use in your video projects. Navigate to the File menu, select Share, and choose the desired export settings, including format, resolution, and output destination. Click Next to render the video with the motion blur effect applied and save it to your desired destination.
Tips and Best Practices:
- Use motion blur sparingly and strategically to enhance the realism and visual quality of moving objects in your footage.
- Experiment with different motion blur settings, such as shutter angle and motion blur samples, to achieve the desired look and feel for your project.
- Pay attention to the speed and direction of moving objects when applying motion blur, as it can affect the appearance and intensity of the blur.
- Consider combining motion blur with other visual effects and techniques, such as slow motion and time remapping, to create dynamic and visually compelling sequences.
- Preview the motion blur effect on different devices and platforms to ensure compatibility and consistency across various playback environments.
Conclusion: The motion blur effect in Final Cut Pro is a versatile tool that allows users to add realistic motion blur to their video projects, enhancing the visual quality and realism of moving objects. By following the step-by-step process outlined in this guide and experimenting with different settings and techniques, you can master the art of motion blur and create stunning visual effects that captivate your audience and elevate the quality of your video projects. Whether you’re editing action sequences, animations, or motion graphics, Final Cut Pro offers powerful tools and features for achieving professional-quality motion blur effects that enhance the overall impact and immersion of your videos.


