


Mastering the RAND and RANDBETWEEN Functions in Excel: A Comprehensive Guide
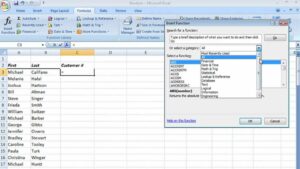
Excel is a powerful tool for data analysis, and the RAND and RANDBETWEEN functions are essential features for generating random...
 Instructions on How to Take Screenshots While Scrolling on Windows and macOS
  How to Speed Up Your Windows PC Without Installing Extra Software
  A Guide to Working Remotely Like a Pro: Configuration, Tools, and the Most Effective Methods
  How to Make Images Generated by Artificial Intelligence Look Realistic
  (A Step-by-Step Guide) How to Improve the Speed of Your Internet Connection at Home
 Excel is a powerful tool for data analysis, and the RAND and RANDBETWEEN functions are essential features for generating random...

In the ever-evolving landscape of e-commerce, customer reviews play a crucial role in shaping purchasing decisions and establishing trust between...

In the dynamic world of e-commerce, cultivating customer loyalty is paramount for long-term success. Amazon's Subscribe & Save program offers...

In the vast and competitive landscape of e-commerce, mastering search engine optimization (SEO) is essential for driving visibility, traffic, and...

In the ever-evolving landscape of e-commerce, establishing a strong brand presence is essential for success, and one of the most...

In the bustling marketplace of Amazon, offering product variations and options is a strategic imperative for sellers looking to cater...

Introduction: In the bustling realm of social media, maintaining a harmonious and enjoyable experience often involves managing the content and...