How to use Windows Update Troubleshooter in Windows 8
Windows Update is a crucial component of the Windows operating system, responsible for delivering security patches, bug fixes, and feature updates to keep your computer running smoothly and securely. However, sometimes Windows Update can encounter issues that prevent it from functioning correctly, such as failing to download or install updates, getting stuck at a certain percentage, or displaying error codes. When faced with such issues, users can turn to the Windows Update Troubleshooter—a built-in diagnostic tool designed to identify and resolve common Windows Update problems automatically. In this comprehensive guide, we’ll explore everything you need to know about using the Windows Update Troubleshooter in Windows 8, from accessing the tool to running diagnostics and applying fixes effectively.
Understanding Windows Update Troubleshooter:
The Windows Update Troubleshooter is a diagnostic tool provided by Microsoft to help users diagnose and fix issues related to Windows Update. It is designed to automatically detect and resolve common problems that may prevent Windows Update from functioning correctly, such as missing or corrupted system files, incorrect settings, or network connectivity issues. The troubleshooter walks users through a series of diagnostic steps and applies fixes where necessary to restore Windows Update functionality and ensure that updates can be downloaded and installed successfully.
Accessing Windows Update Troubleshooter:
To access the Windows Update Troubleshooter in Windows 8, follow these steps:
- Open Control Panel: Press the Windows key + X to open the Power User menu, then click or tap on “Control Panel.”
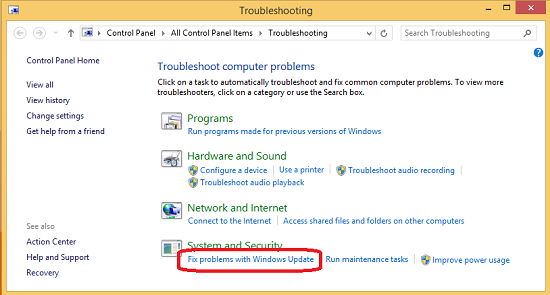
- Access Troubleshooting: In the Control Panel, navigate to “System and Security” > “Troubleshooting.” This opens the Troubleshooting window, which contains a list of available troubleshooting tools and wizards.
- Run Windows Update Troubleshooter: Scroll down the list of troubleshooting tools and locate “Fix problems with Windows Update.” Click or tap on this option to launch the Windows Update Troubleshooter.
Running Windows Update Troubleshooter:
Once you’ve launched the Windows Update Troubleshooter, follow these steps to run diagnostics and apply fixes:
- Start Troubleshooting: Click or tap on “Advanced” to view additional troubleshooting options, such as applying repairs automatically or running as an administrator. Then, click or tap on “Run as administrator” to run the troubleshooter with elevated privileges (recommended).
- Detecting Problems: The Windows Update Troubleshooter will start detecting problems related to Windows Update. This may take a few moments, as the troubleshooter scans your system for issues that may be affecting Windows Update functionality.
- Applying Fixes: Once the troubleshooter has identified any problems, it will present you with a list of detected issues along with recommended fixes. Review the list of issues and click or tap on “Apply this fix” to apply the recommended fixes automatically.
- Follow Instructions: Follow any on-screen instructions provided by the troubleshooter to complete the troubleshooting process. This may involve restarting your computer or making additional changes to system settings.
- Review Results: After the troubleshooting process is complete, the troubleshooter will display a summary of the results, indicating whether any issues were detected and whether fixes were applied successfully. Review the results to ensure that Windows Update functionality has been restored.
Troubleshooting Additional Issues:
If the Windows Update Troubleshooter is unable to resolve your Windows Update issues or if you encounter errors during the troubleshooting process, there are several additional steps you can take to troubleshoot and resolve the problem manually:
- Check Internet Connection: Ensure that your computer is connected to the internet and that your internet connection is stable. Windows Update requires an active internet connection to download updates from Microsoft servers.
- Restart Windows Update Service: Open the Services console (services.msc) and locate the Windows Update service. Ensure that the service is running and set to start automatically. If the service is stopped, right-click on it and select “Start.”
- Clear Update Cache: Sometimes, corrupted or incomplete update files in the Windows Update cache can cause issues. You can clear the Windows Update cache by stopping the Windows Update service, deleting the contents of the SoftwareDistribution folder, and then restarting the service.
- Check Disk Space: Ensure that your computer has enough free disk space to download and install updates. If your system drive is running low on space, consider freeing up space by deleting unnecessary files or moving files to an external storage device.
- Check for System File Corruption: Use the System File Checker (SFC) tool to scan for and repair corrupted system files that may be affecting Windows Update. Open Command Prompt as an administrator and run the command “sfc /scannow” to initiate the scan.
Conclusion:
The Windows Update Troubleshooter is a valuable tool for diagnosing and fixing common issues related to Windows Update in Windows 8. By accessing the troubleshooter from the Control Panel and running diagnostics, users can identify and resolve problems that may be preventing Windows Update from functioning correctly, such as missing or corrupted system files, incorrect settings, or network connectivity issues. In cases where the troubleshooter is unable to resolve the issue, users can follow additional troubleshooting steps to address the problem manually. By staying proactive and vigilant about Windows Update issues, users can ensure that their computer remains up to date with the latest security patches, bug fixes, and feature updates, helping to maintain system stability, security, and performance.