Mastering the Art of Panorama Images with Photoshop: A Comprehensive Guide to Seamless Landscape Stitching
Introduction
In the realm of digital photography, capturing vast landscapes or expansive cityscapes often exceeds the limitations of a single frame. This is where the art of panorama images comes into play, offering a breathtaking way to showcase the grandeur of a scene. Adobe Photoshop, a powerhouse in the world of digital editing, provides a robust set of tools for seamlessly stitching together multiple images into a stunning panorama. In this comprehensive guide, we will delve into the step-by-step process of creating panorama images with Photoshop, exploring essential techniques, advanced features, and creative strategies to elevate your panoramic photography skills.
Understanding Panoramic Photography
- The Essence of Panoramas: Panoramic photography involves capturing an extended field of view beyond what a standard lens can cover in a single shot. This technique is ideal for landscapes, cityscapes, and architectural photography.
- Challenges and Opportunities: While panoramic photography presents challenges like maintaining consistency in exposure and alignment, it also provides an opportunity to create visually immersive and expansive images.
Step 1: Capturing the Images
- Use a Tripod: To ensure precise alignment during the stitching process, mount your camera on a tripod. This step minimizes variations in perspective and facilitates smoother merging of images.
- Overlap for Continuity: Capture a series of images with overlapping sections. A 20-30% overlap between consecutive frames is generally recommended to provide sufficient data for Photoshop to seamlessly merge the images.
Step 2: Importing Images into Photoshop
- Open Photoshop: Launch Adobe Photoshop on your computer and open the software to begin the panoramic stitching process.
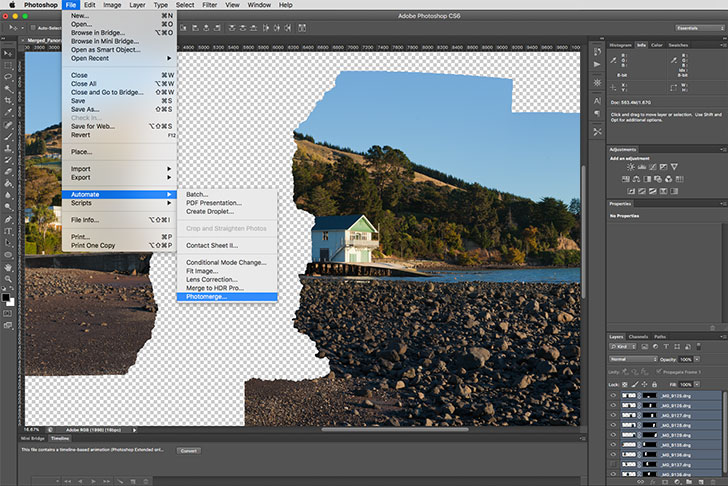
- Load Images: Navigate to “File” > “Automate” > “Photomerge” to access the Photomerge tool. Select “Browse” to load the series of images you want to stitch into a panorama.
Step 3: Choosing Photomerge Options
- Select Photomerge Layout: In the Photomerge dialog box, choose the layout that best suits your images. “Auto” is a versatile option that generally works well for most panoramic compositions.
- Blend Images Together: Enable the “Blend Images Together” option to seamlessly merge the overlapping sections. This feature ensures a smooth transition between individual frames, minimizing visible seams.
Step 4: Aligning and Merging Images
- Click “OK” to Begin: Once you’ve selected your options, click “OK” to let Photoshop analyze and align the images. This process may take a few moments, depending on the number and resolution of the images.
- Automatic Alignment: Photoshop will automatically align the images, compensating for any minor variations in camera positioning or movement between shots.
Step 5: Refining the Panorama
- Crop for Composition: After merging, the resulting image may have irregular edges. Use the Crop Tool to refine the composition, removing any unwanted areas and creating a clean, well-defined panorama.
- Adjust Image Alignment: If needed, use the Move Tool to manually adjust the alignment of the panorama. Photoshop’s layers allow you to fine-tune the positioning of individual frames for optimal visual cohesion.
Step 6: Correcting Distortion and Anomalies
- Address Lens Distortion: Correct any lens distortion or anomalies that may have occurred during the merging process. Photoshop provides lens correction tools to rectify issues like barrel distortion or vignetting.
- Clone and Heal: Use the Clone Stamp and Healing Brush tools to address any remaining imperfections or artifacts in the panorama. This step ensures a polished and visually appealing final result.
Step 7: Enhancing Color and Contrast
- Adjust Color and Tone: Fine-tune the color balance, saturation, and tonal range to enhance the overall visual appeal of your panorama. The adjustment layers in Photoshop provide non-destructive editing capabilities.
- Apply Filters and Effects: Experiment with filters or effects to add a creative touch to your panorama. This step can include sharpening details, adding vignettes, or even applying artistic filters for a unique look.
Step 8: Saving and Exporting
- Save Your Project: Save your Photoshop project in its native PSD format to retain editability. This is especially important if you plan to revisit the panorama for further adjustments.
- Export for Sharing: When satisfied with the final result, export your panorama in a suitable format for sharing or printing. Common formats include JPEG or TIFF, depending on your intended use.
Step 9: Showcasing Your Panorama
- Share on Social Media: Showcase your panoramic masterpiece on social media platforms. Many platforms support panoramic images and provide an immersive viewing experience for your audience.
- Print and Frame: For tangible appreciation, consider printing your panorama and framing it. The wide format of panoramas often makes for striking wall art, adding a touch of grandeur to any space.
Step 10: Seek Feedback and Continue Exploring
- Gather Feedback: Share your panoramic creation with peers, photography communities, or mentors to receive constructive feedback. External perspectives can provide insights for improvement.
- Experiment with Variations: Use the knowledge gained from creating your panorama to experiment with different compositions, styles, or locations. Panoramic photography offers endless possibilities for creative exploration.
Conclusion: Unleashing the Panoramic Potential
Creating panoramic images with Photoshop is a journey into the expansive realm of visual storytelling. Through careful planning, precise capturing, and meticulous post-processing, you have transformed a series of images into a seamless and captivating panorama. As you continue honing your panoramic photography skills, remember that each composition is an opportunity to convey the vast beauty of the world. Unleash the panoramic potential of your creativity, explore new landscapes, and let Adobe Photoshop be your trusted companion in stitching together the grand tapestry of your visual narratives.


