Mastering Digital Sculpture: A Comprehensive Guide to Adjusting Facial Features Using the Puppet Warp Tool in Adobe Photoshop

Introduction
Adobe Photoshop, a powerhouse in the world of digital design, offers a versatile set of tools for creative manipulation and enhancement. Among these, the Puppet Warp tool stands out as a dynamic feature that empowers designers to reshape and refine facial features with precision and ease. In this extensive guide, we will embark on a detailed journey through the process of adjusting facial features using the Puppet Warp tool in Adobe Photoshop. From subtle refinements to transformative edits, this guide will equip you with the skills to become a digital sculptor, shaping portraits with finesse and artistry.
Understanding the Puppet Warp Tool
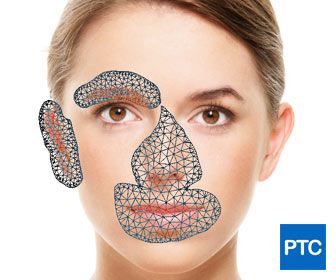
- Locating the Tool: The Puppet Warp tool can be found in the Edit menu under “Puppet Warp.” It allows you to create a mesh over the selected area, enabling you to place control points and manipulate the content with natural flexibility.
- Benefits of Puppet Warp: The Puppet Warp tool is particularly useful for adjusting facial features, as it provides a non-destructive and customizable way to reshape elements without compromising image quality.
Step 1: Preparing the Image
- Open the Image in Photoshop: Launch Adobe Photoshop and open the image you want to work on. Ensure that the image has sufficient resolution for detailed adjustments.
- Duplicate the Layer: Before applying any changes, duplicate the layer to maintain an original copy. This step is crucial for preserving the integrity of the original image.
Step 2: Selecting Facial Features
- Isolate the Feature: Use selection tools like the Lasso or Marquee to isolate the facial feature you want to adjust. For example, focus on the eyes, nose, or mouth individually for more precise editing.
- Apply Puppet Warp: With the desired feature selected, navigate to the Edit menu and choose Puppet Warp. This action will generate a mesh over the selected area.
Step 3: Placing Control Points
- Add Control Points: Click on the areas of the mesh where you want to place control points. These points act as anchors for the feature you’re adjusting. Strategic placement is key for achieving natural-looking edits.
- Create Pins for Stability: Add additional control points along the edges or areas that you want to remain stable. These pins prevent unwanted distortion in regions outside the adjusted feature.
Step 4: Adjusting and Sculpting
- Move and Rotate Control Points: Use the Puppet Warp tool to click and drag control points. This action allows you to move and rotate the selected facial feature dynamically. Experiment with different movements to achieve the desired result.
- Bend and Curve Edges: Utilize the control points to bend and curve the edges of the facial feature. This step is particularly effective for refining shapes and contours, ensuring a seamless integration with the rest of the face.
Step 5: Fine-Tuning and Detailing
- Zoom In for Precision: Zoom in on the image to make precise adjustments. This level of detail is crucial, especially when refining smaller features like eyelashes, eyebrows, or lip contours.
- Add and Remove Control Points: Feel free to add or remove control points as needed. If certain areas require more stability or flexibility, adjust the placement of control points accordingly.
Step 6: Preview and Refine
- Toggle Visibility of Mesh: Toggle the visibility of the mesh on and off to preview the adjustments. This feature allows you to assess the changes and make additional refinements if necessary.
- Compare Before and After: Periodically compare the edited version with the original by toggling the visibility of the duplicated layer. This comparison ensures that your adjustments align with your vision for the final result.
Step 7: Apply Changes and Save
- Commit Changes: Once satisfied with the adjustments, commit the changes by pressing Enter or clicking the checkmark in the options bar. This action finalizes the edits made with the Puppet Warp tool.
- Save Your Edited Image: Save your edited image in an appropriate format, preserving the layers if further adjustments might be necessary in the future.
Step 8: Experimenting with Multiple Features
- Repeat the Process: Apply the Puppet Warp tool to different facial features as needed. This iterative process allows you to sculpt and refine each element independently, contributing to an overall harmonious result.
- Maintain Consistency: Ensure consistency in your edits across various features. Pay attention to proportions and symmetry to achieve a natural and balanced appearance.
Step 9: Seeking Feedback and Iterating
- Gather Feedback: Share your edited image with peers, mentors, or online communities to receive constructive feedback. External perspectives can offer valuable insights and suggestions for improvement.
- Iterate Based on Feedback: Use the feedback as a guide for further iterations. Return to the Puppet Warp tool or other Photoshop features to address specific areas that may benefit from additional refinement.
Step 10: Applying Final Touches
- Global Adjustments: Consider making global adjustments to the entire image, such as color grading, contrast, or sharpening. These enhancements contribute to a cohesive and polished final result.
- Save and Showcase Your Work: Save the final version of your image and showcase your digital sculpting skills. Whether in your portfolio, on social media, or within design communities, highlight the transformative power of the Puppet Warp tool.
Conclusion: Elevating Facial Feature Editing with Precision
Mastering the Puppet Warp tool in Adobe Photoshop opens up a realm of possibilities for adjusting facial features with precision and artistry. From subtle enhancements to dramatic transformations, this versatile tool empowers designers to sculpt and refine portraits with finesse. As you delve into the world of digital sculpting, remember that practice, experimentation, and a keen eye for detail are key elements in honing your skills. Embrace the creative journey, push the boundaries of facial feature editing, and let the Puppet Warp tool be your guide to crafting visually stunning and harmonious portraits in the digital realm.


