From Pixels to Pencil: A Comprehensive Guide on Transforming a Photo into a Detailed Sketch with Photoshop
Introduction:
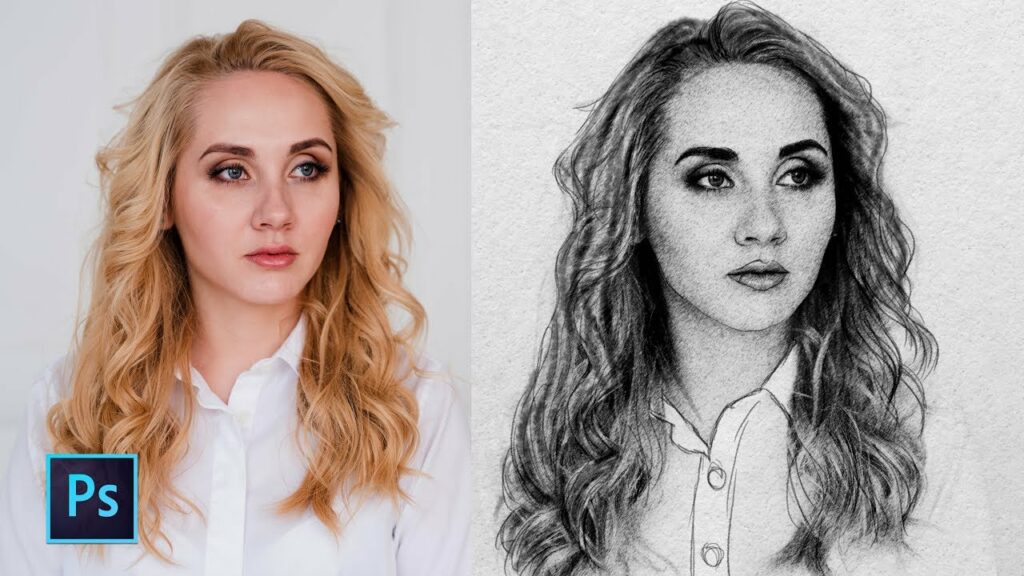
In the realm of digital artistry, the marriage of technology and creativity enables artists to bridge the gap between the virtual and the traditional. One captivating technique that exemplifies this convergence is the transformation of a photograph into a detailed sketch using Adobe Photoshop. This comprehensive guide will walk you through the intricate process of converting a photo into a detailed sketch, unlocking the potential to infuse your digital creations with the timeless charm of hand-drawn artwork.
I. Understanding the Art of Photo-to-Sketch Conversion:
1.1 The Fusion of Realism and Artistic Expression:
- Converting a photo into a detailed sketch allows artists to combine the realism captured in a photograph with the expressiveness and character of hand-drawn sketches.
- This technique is versatile, lending itself to a wide range of artistic styles, from realistic pencil drawings to stylized sketches.
1.2 Creative Applications:
- Photo-to-sketch conversion is a valuable tool for artists, photographers, and graphic designers seeking to add a handcrafted touch to their digital compositions.
- It provides a unique way to reimagine and reinterpret photographic moments, offering a fresh perspective on familiar scenes.
II. Selecting the Right Photo:
2.1 Image Considerations:
- Choose a photo with distinct subjects and clear details. Images with strong contrasts, well-defined shapes, and a range of textures often yield compelling sketch results.
- Consider the composition, ensuring that the main subjects are prominently featured and easily recognizable.
2.2 High-Quality Source:
- Start with a high-resolution image to maintain clarity and detail throughout the sketching process.
- A high-quality source image serves as the foundation for achieving an intricate and realistic sketch.
III. Step-by-Step Guide to Creating a Detailed Sketch in Photoshop:
3.1 Open Your Image in Photoshop:
- Launch Adobe Photoshop and open the photo you wish to transform into a detailed sketch.
3.2 Duplicate the Background Layer:
- Right-click on the Background layer in the Layers panel and choose “Duplicate Layer.” This step preserves the original image while providing a layer for sketching.
3.3 Desaturate the Image:
- Go to Image > Adjustments > Desaturate to convert the image to grayscale. This step simplifies the color information, focusing on tonal values for the sketch.
3.4 Apply Gaussian Blur:
- Go to Filter > Blur > Gaussian Blur. Apply a moderate blur to reduce small details and create a smoother foundation for the sketch.
- Experiment with the blur radius to find the right balance for your image.
3.5 Duplicate the Layer:
- Duplicate the blurred layer by right-clicking on it and choosing “Duplicate Layer.” This step provides a backup layer for refining details later.
3.6 Apply the High Pass Filter:
- With the duplicated blurred layer selected, go to Filter > Other > High Pass.
- Adjust the radius until the edges of prominent details in the image become visible. This step enhances the edges for better sketch definition.
3.7 Set the Blend Mode:
- Change the blend mode of the High Pass layer to Overlay. This blending mode enhances the details and edges while preserving the overall tonal values.
3.8 Adjust Levels:
- Fine-tune the sketch’s contrast by going to Image > Adjustments > Levels. Move the sliders to enhance the dark and light areas, refining the overall sketch appearance.
3.9 Create a New Layer for Fine Details:
- Create a new layer above the sketch layers for adding fine details.
- Use a digital drawing tablet and stylus for more control, but a mouse can also be used for basic sketching.
3.10 Sketching with Brushes:
- Select a brush tool and experiment with various brush types. Photoshop offers a range of pencil and charcoal brushes that mimic traditional sketching tools.
- Vary the brush size and opacity to capture different levels of detail.
3.11 Refine and Experiment:
- Zoom in to specific areas and continue refining the sketch. Pay attention to details, textures, and subtle transitions between light and shadow.
- Experiment with different brushes and settings to achieve the desired sketch style.
IV. Advanced Techniques and Tips:
4.1 Layer Blend Modes:
- Experiment with different layer blend modes for the sketch layers to achieve varied effects. Multiply and Overlay modes often work well for sketches.
- Adjust layer opacities to control the intensity of the sketch effect.
4.2 Texture Overlay:
- Introduce texture overlays to simulate the surface of traditional sketching paper. Experiment with blending modes and opacity to achieve a natural texture.
- Texture overlays can add authenticity and depth to the digital sketch.
4.3 Color Tinting:
- Explore adding a subtle color tint to your sketch for a unique effect. Create a new layer, set the blend mode to Color, and paint with a low-opacity brush.
- Color tinting can evoke a nostalgic or contemporary atmosphere in your sketch.
4.4 Background Enhancement:
- Consider enhancing the background separately to create a more dynamic composition. Apply filters, adjust contrast, or add textures to the background layer.
- A well-crafted background complements the detailed sketch in the foreground.
V. Saving and Exporting:
5.1 Preserve Original:
- Before saving your final detailed sketch, consider saving a copy of the original layered file. This allows for future adjustments and refinements.
- Keeping the original file preserves flexibility for further creative exploration.
5.2 Export Options:
- Choose the appropriate file format based on your intended use. JPEG is suitable for sharing online, while PSD maintains layers for future edits.
- Save a high-resolution version if you plan to print the detailed sketch.
VI. Showcasing Your Artwork:
6.1 Digital Platforms:
- Share your detailed sketch on digital platforms, social media, or personal websites to showcase your artistic prowess.
- Engage with the digital art community to receive feedback and connect with fellow artists.
6.2 Print and Display:
- Consider printing your detailed sketch on high-quality paper or canvas for physical display.
- Frame the artwork to enhance its presentation, making it a striking addition to any art collection.
Conclusion:
The journey from a photograph to a detailed sketch in Photoshop is a testament to the versatility and power of digital artistry. As you explore this transformative process, embrace the nuances of sketching, from bold strokes to subtle details, and let your creativity flow. Whether you’re aiming for a realistic portrayal or a stylized interpretation, the detailed sketching technique allows you to infuse your digital creations with the charm and expressiveness of traditional hand-drawn artwork. With each stroke, you breathe life into pixels, and with each detail, you redefine the boundaries of digital art. Step into the realm of photo-to-sketch conversion, where imagination knows no bounds, and the fusion of technology and artistry creates timeless masterpieces.


