Crafting Precision: A Comprehensive Guide to Creating Strokes with Pointy Corners in Photoshop
Adam.Smith March 1, 2024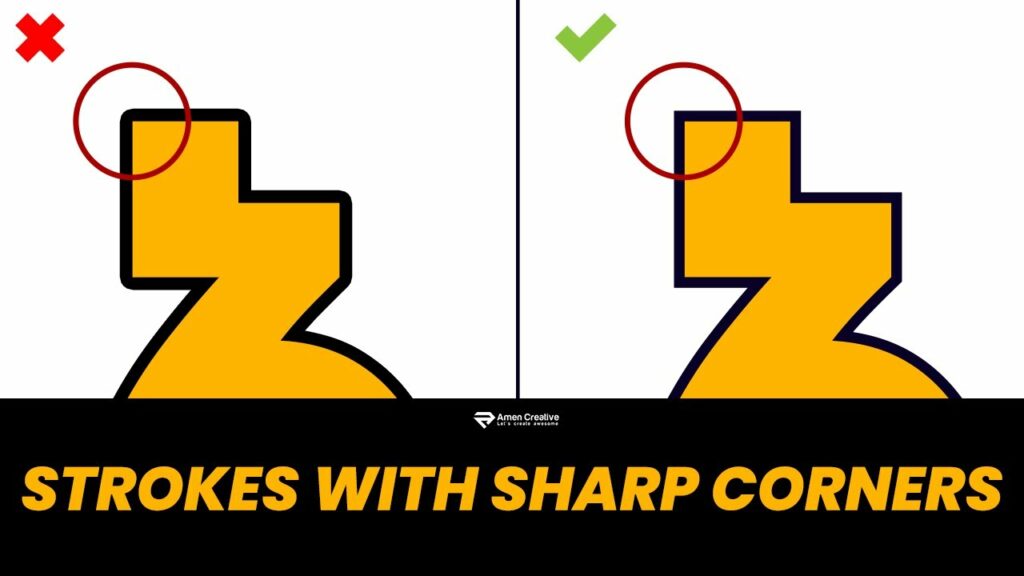
Adobe Photoshop, a powerhouse in digital design, provides a plethora of tools and features for graphic artists to bring their visions to life. One crucial aspect of design is mastering strokes, especially those with pointy corners that add precision and edge to your creations. In this extensive guide, we will unravel the steps to seamlessly create strokes with pointy corners in Photoshop, exploring the tools, techniques, and nuances that ensure your designs exude sharpness and meticulous detail.
Section 1: Navigating the Photoshop Interface
1.1 Setting the Stage
Before delving into creating strokes, familiarize yourself with the Photoshop interface. Open the program and create a new document or open an existing one where you want to apply strokes with pointy corners.
1.2 Selecting the Brush Tool
Navigate to the Toolbar on the left side of the screen and select the Brush Tool (B). This tool serves as the primary instrument for creating strokes in Photoshop.
Section 2: Basic Stroke Creation
2.1 Brush Settings
In the Options Bar at the top of the screen, you’ll find various settings for the Brush Tool. Adjust the brush size according to your preference. For strokes with pointy corners, a smaller brush size is often more effective, providing greater control over details.
2.2 Choosing a Color
Select the color you want for your stroke by clicking on the foreground color swatch at the bottom of the Toolbar. Experiment with different colors to suit your design. Once chosen, the selected color becomes the active color for your brush.
2.3 Applying the Basic Stroke
Click and drag the brush across your canvas to create a basic stroke. Experiment with different lengths and directions to understand how the brush behaves. This basic stroke serves as the foundation for refining and adding pointy corners.
Section 3: Adding Pointy Corners
3.1 Utilizing the Pen Tool
To add precision and pointy corners to your strokes, the Pen Tool (P) becomes your ally. Select the Pen Tool from the Toolbar and carefully plot anchor points along the stroke where you want the corners to appear.
3.2 Adjusting Anchor Points
Click and drag on the anchor points to adjust the direction handles. Pull the handles in the desired direction to create sharp corners. The length and angle of the handles determine the curvature of the corner, allowing you to achieve pointy and precise results.
Section 4: Embracing the Shape Dynamics
4.1 Accessing the Brush Panel
To enhance your strokes further, delve into the Brush Panel. You can find this panel by going to Window > Brush or by clicking the brush icon in the Options Bar while the Brush Tool is selected.
4.2 Shape Dynamics Settings
Within the Brush Panel, explore the Shape Dynamics settings. Adjust the Size Jitter and Angle Jitter sliders to introduce variability in the stroke thickness and angle. This adds an organic and dynamic quality to your strokes, especially around pointy corners.
Section 5: Layer Styles for Depth
5.1 Layer Styles Options
Elevate your strokes by applying Layer Styles. Right-click on the layer containing your stroke and choose “Blending Options.” Experiment with options such as Outer Glow, Inner Shadow, or Bevel & Emboss to add depth and dimension to the stroke, emphasizing the pointy corners.
5.2 Opacity and Blend Modes
Fine-tune the opacity of your stroke layer to control its transparency. Additionally, explore different blend modes to see how they interact with the underlying layers. This experimentation can lead to unique and captivating visual effects.
Section 6: Advanced Techniques
6.1 Custom Brushes
Expand your creative arsenal by experimenting with custom brushes. Photoshop allows you to import and use brushes created by other artists or design your own. Custom brushes can introduce intricate patterns and textures to your strokes, enhancing the overall visual impact.
6.2 Brush Presets
Save time and maintain consistency by creating brush presets. Once you’ve fine-tuned your brush settings, save them as a preset for future use. This is especially useful when working on projects that require a consistent style across multiple elements.
Section 7: Fine-Tuning and Refinement
7.1 Layer Masks
Refine your strokes with precision using layer masks. Add a layer mask to your stroke layer and use a soft brush to mask out or reveal specific areas. Layer masks provide a non-destructive way to fine-tune the edges and details of your strokes.
7.2 Adjustment Layers
Experiment with Adjustment Layers to enhance the overall color and tone of your strokes. Whether it’s adding a subtle hue or adjusting the contrast, Adjustment Layers offer a flexible way to fine-tune the appearance of your design elements.
Section 8: Saving and Exporting
8.1 Save Your Project
Before finalizing your design, save your Photoshop project (PSD file) to preserve all layers and settings. This allows for future edits and adjustments.
8.2 Exporting for Different Purposes
When ready to share or use your design, consider exporting it in a suitable format. For web use, PNG or JPEG are common choices, while for print, consider formats like TIFF or PDF to ensure high resolution.
Conclusion: Precision Unleashed
Mastering the creation of strokes with pointy corners in Photoshop adds a layer of precision and detail to your digital designs. By combining fundamental brush techniques with advanced tools and settings, you can craft strokes that exude sharpness and meticulousness. Whether you’re working on illustrations, typography, or intricate design elements, the ability to create pointy corners with strokes opens up a world of creative possibilities. So, dive into Photoshop, hone your skills, and let your designs resonate with the precision and edge of masterful strokes!


