The ABCs of Typography: A Comprehensive Guide to Installing and Deleting Fonts in Windows 10

Introduction:
Windows 10, known for its flexibility and customization options, allows users to extend their creativity to the realm of typography. The ability to install and delete fonts provides users with the means to personalize their digital spaces, unleashing a world of possibilities for design and expression. In this exhaustive guide, we will delve into the intricacies of managing fonts in Windows 10, exploring the steps to install new fonts and seamlessly remove them, empowering users to craft a typographic experience that aligns with their vision.
Section 1: Understanding Fonts in Windows 10
1.1 The Role of Fonts:
- Fonts play a crucial role in shaping the visual identity of digital content. Windows 10 comes pre-loaded with a variety of fonts, but users can expand this repertoire by adding new fonts to enhance their creative projects.
1.2 Font Types:
- Windows 10 supports various font formats, including TrueType (.ttf), OpenType (.otf), and others. Understanding these formats is essential when choosing and installing fonts for specific applications or design projects.
Section 2: Installing Fonts in Windows 10
2.1 Accessing the Fonts Folder:
- The process of installing fonts begins with accessing the Fonts folder. Users can do this by opening the File Explorer, navigating to the C: drive, and selecting the “Windows” folder, followed by the “Fonts” folder.
2.2 Font Installation Methods:
- Windows 10 offers multiple methods for installing fonts:
- Drag and Drop: Users can drag font files directly into the Fonts folder.
- Right-Click Install: Right-clicking on a font file and selecting “Install” is another straightforward method.
2.3 Using the Fonts Settings:
- For a more centralized approach, users can install fonts through the Fonts section in the Settings menu. Access Settings, navigate to “Personalization,” and select “Fonts” to find the option to install new fonts.
Section 3: Installing Fonts from the Microsoft Store
3.1 Microsoft Store Font Collection:
- Windows 10 users can explore and download fonts directly from the Microsoft Store. This user-friendly method provides a curated collection of fonts, making it convenient for users to discover and install new typefaces.
3.2 Applying Filters:
- When browsing fonts on the Microsoft Store, users can apply filters based on style, language support, and more. This enables a tailored search experience, ensuring users find fonts that suit their specific needs.
Section 4: Managing Fonts through Control Panel
4.1 Accessing Control Panel:
- Users can also manage fonts through the Control Panel. Access the Control Panel by searching in the Start menu, navigate to “Appearance and Personalization,” and select “Fonts.”
4.2 Font Preview and Information:
- The Fonts section in the Control Panel provides a detailed view of installed fonts, complete with a preview of each typeface. Users can gather information about font characteristics, such as style and designer details.
Section 5: Organizing Fonts with Font Book
5.1 Using Font Book:
- Windows 10 introduces Font Book, a built-in application for organizing and managing fonts. Users can access Font Book through the Settings menu, providing a centralized hub for font-related tasks.
5.2 Previewing Fonts:
- Font Book allows users to preview installed fonts, facilitating informed decisions when choosing typefaces for different projects. The application displays a sample of each font’s characters, aiding users in selecting the right style.
Section 6: Deleting Fonts in Windows 10
6.1 Removing Fonts from Fonts Folder:
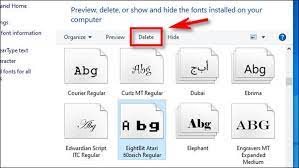
- Deleting fonts involves accessing the Fonts folder through File Explorer and selecting the fonts to be removed. Users can right-click on the chosen fonts and select “Delete” to remove them from the system.
6.2 Deleting Fonts via Control Panel:
- Alternatively, users can use the Control Panel to delete fonts. Access the Fonts section, right-click on the font to be deleted, and select “Delete” to remove it from the system.
Section 7: Ensuring System Stability and Compatibility
7.1 Cautionary Steps:
- When deleting fonts, users should exercise caution to avoid removing essential system fonts, which could impact system stability. It’s advisable to research the fonts and their potential uses before deletion.
7.2 Creating Font Backups:
- To ensure safety, users can create backups of fonts before deletion. This involves copying the font files to a separate location, providing a safety net in case a deleted font needs to be restored.
Section 8: Troubleshooting Font Issues
8.1 Font Installation Errors:
- Users may encounter issues during font installation. Troubleshoot common errors by ensuring the font files are not corrupted, using valid font formats, and checking for any system-related issues.
8.2 Font Display Problems:
- If fonts don’t display correctly in applications, troubleshooting involves verifying the font format, checking for conflicts with other fonts, and ensuring that the application supports the chosen font.
Conclusion: Shaping a Typographic Identity in Windows 10
As we conclude this comprehensive guide, it’s evident that managing fonts in Windows 10 is not just a technical task but a creative endeavor. Whether users are installing new fonts to enhance their design projects or deleting fonts to streamline their font library, Windows 10 provides a robust set of tools for shaping a typographic identity.
By mastering the art of font installation and deletion, users can curate a diverse collection of typefaces that align with their creative vision. Whether you’re a graphic designer seeking the perfect font for a project or an enthusiast exploring the vast world of typography, Windows 10 empowers you to personalize your digital spaces and elevate your visual communication. As you embark on your typographic journey, let Windows 10 be the canvas on which you paint a rich tapestry of fonts, transforming your digital environment into a typographic masterpiece.


