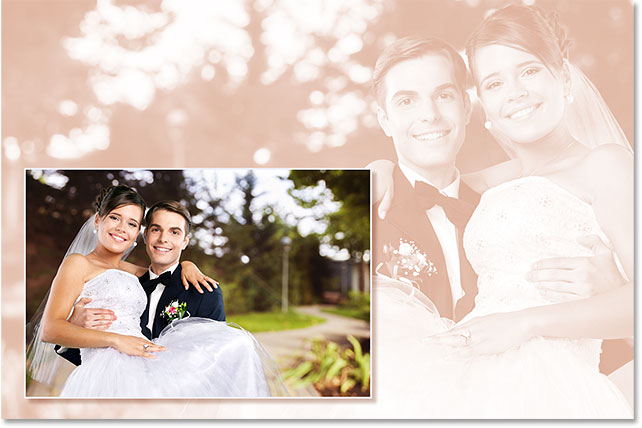
Seamless Integration: Mastering the Art of Using a Photo as Its Own Background with Photoshop

Introduction:
In the ever-evolving landscape of digital art and design, Photoshop stands as a formidable tool, offering an array of possibilities for creative expression. One intriguing technique that has gained popularity is using a photo as its own background. This method transforms an image into a self-contained visual masterpiece, seamlessly blending the subject with its surroundings. In this comprehensive guide, we will delve into the step-by-step process of using a photo as its own background with Photoshop, unlocking the potential for captivating and harmonious compositions.
I. Understanding the Concept:
1.1 The Art of Integration:
- Using a photo as its own background involves merging the subject seamlessly with its surroundings within the same image.
- This technique creates a cohesive and visually engaging composition, eliminating the traditional distinction between the foreground and background.
1.2 Creative Applications:
- This method is particularly useful in creating surreal or dreamlike scenes where the subject appears organically integrated into its environment.
- Photographers and digital artists often employ this technique to enhance storytelling and evoke a sense of unity within an image.
II. Preparing Your Image:
2.1 Choose the Right Image:
- Select an image with a subject that can be effectively integrated into its own background.
- Consider factors such as lighting, perspective, and color tones to ensure a seamless blend.
2.2 High-Quality Image:
- Start with a high-resolution image to preserve details during the integration process.
- A high-quality source image provides more flexibility for adjustments and refinements.
III. Step-by-Step Guide to Using a Photo as Its Own Background:
3.1 Open Your Image in Photoshop:
- Launch Adobe Photoshop and open the image you intend to work with.
3.2 Duplicate the Background Layer:
- Right-click on the Background layer in the Layers panel and choose “Duplicate Layer.” This step ensures that your original image remains intact.
3.3 Select Subject with Pen Tool:
- Use the Pen Tool (‘P’) to carefully outline the subject in your image. Take your time to create a precise selection.
- Once the selection is complete, right-click and choose “Make Selection.”
3.4 Invert the Selection:
- With the subject selected, go to Select > Inverse. This inverts the selection, now including everything except the subject.
3.5 Create Layer Mask:
- Click the “Add Layer Mask” icon at the bottom of the Layers panel. This action masks out the background, leaving only the subject visible.
3.6 Fine-Tune the Mask:
- Refine the layer mask using brushes and the Brush Tool (‘B’). Adjust the mask’s opacity and hardness to create a seamless transition between the subject and the background.
3.7 Copy the Subject Layer:
- Right-click on the layer containing your subject and choose “Duplicate Layer.” This creates a copy of the subject layer.
3.8 Place the Copy Behind the Original:
- Drag the duplicated layer beneath the original subject layer in the Layers panel. This layer will serve as the background.
3.9 Scale and Position:
- Resize and reposition the background layer to ensure a harmonious composition. Press ‘Ctrl+T’ to enter Free Transform mode and adjust accordingly.
3.10 Add Filters and Adjustments:
- Apply filters and adjustments to both layers for a cohesive look. Consider adjustments to color balance, brightness, and contrast to unify the image.
IV. Advanced Techniques and Tips:
4.1 Background Enhancements:
- Experiment with background enhancements such as blurring, color grading, or applying texture overlays to create a more dynamic and immersive environment.
4.2 Lighting Consistency:
- Pay attention to lighting sources in both the subject and the background. Adjust the brightness and contrast to maintain a consistent lighting environment.
4.3 Shadows and Highlights:
- Create realistic shadows beneath the subject to enhance the integration. Use the Burn Tool to add shadows and the Dodge Tool for highlights.
4.4 Texture Matching:
- Ensure that the texture of the subject and background layers match. Adjust the levels of noise or add a subtle grain effect for cohesion.
V. Saving and Exporting:
5.1 Preserve Original:
- Before saving your final composition, consider saving a copy of the original layered file. This allows for future adjustments without loss of quality.
5.2 Export Options:
- Choose the appropriate file format based on your intended use. JPEG is suitable for web and sharing, while PSD maintains layers for further editing.
VI. Showcasing Your Artwork:
6.1 Digital Platforms:
- Share your masterpiece on digital platforms, social media, or personal websites to showcase your creativity.
- Provide insights into your process to engage and inspire other artists.
6.2 Print and Display:
- For physical display, consider printing your artwork on high-quality paper or canvas.
- Frame the piece to enhance its presentation, making it a striking addition to any art collection.
Conclusion:
Mastering the art of using a photo as its own background with Photoshop unlocks a realm of creative possibilities, allowing artists to seamlessly integrate subjects into captivating environments. This technique not only showcases technical proficiency but also highlights the artist’s ability to envision and create cohesive visual narratives. As you explore this method, embrace experimentation, and let your imagination guide you. Whether you aim for surreal and dreamlike scenes or realistic integrations, the power of Photoshop allows you to transform your vision into a stunning reality. Illuminate your subjects, blend worlds, and craft visual stories that resonate with viewers, proving that within the realm of digital artistry, the possibilities are as limitless as your creativity.


