Mastering the Art of Color Halftone Effects in Photoshop: A Comprehensive Guide to Elevate Your Designs

Introduction:
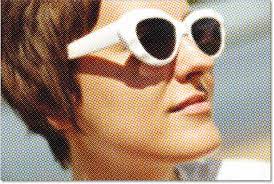
Color halftone effects in Photoshop offer a captivating visual technique that adds depth, texture, and a unique aesthetic to your designs. Whether you’re working on digital art, posters, or any visual project, mastering the art of color halftone effects can elevate your creations to new heights. In this comprehensive guide, we will explore the intricacies of color halftoning in Photoshop, from understanding the basics to advanced techniques, empowering you to create stunning and visually impactful designs.
I. Understanding Color Halftone:
A. Basics of Halftoning:
- Halftoning is a printing technique that simulates continuous tones by using dots of varying sizes.
- In color halftoning, different color channels are separated into halftone dots, creating the illusion of a full spectrum of colors.
B. The Role of Screen Angles:
- Each color channel in a color halftone has a designated screen angle to prevent moiré patterns.
- Common screen angles are 15 degrees for yellow, 45 degrees for black, 75 degrees for magenta, and 105 degrees for cyan.
II. Preparing Your Image for Color Halftone:
A. High-Resolution Images:
- Begin with a high-resolution image to ensure the clarity and quality of the final halftone effect.
- Higher resolution allows for more detailed halftone dots and a crisper appearance.
B. Image Adjustments:
- Adjust the contrast, brightness, and saturation of your image as needed before applying color halftone effects.
- Experiment with different adjustments to achieve the desired visual impact.
III. Applying Basic Color Halftone in Photoshop:
A. Converting to Grayscale:
- Start by converting your image to grayscale to work with individual color channels.
- Go to Image > Mode > Grayscale.
B. Separating Color Channels:
- Duplicate the grayscale image for each color channel (CMYK).
- Go to Image > Mode > CMYK Color.
C. Applying Halftone Filters:
- Select a color channel and go to Filter > Pixelate > Color Halftone.
- Adjust the Max Radius to control the size of the halftone dots.
D. Repeating for Each Color Channel:
- Repeat the process for each color channel, ensuring consistent halftone effects.
- Experiment with different Max Radius values for each channel to create a dynamic and visually appealing result.
IV. Advanced Color Halftone Techniques:
A. Customizing Dot Size and Shape:
- Instead of using the Color Halftone filter, create custom halftone effects using custom shapes or patterns.
- Experiment with different dot shapes and sizes to achieve a unique and personalized halftone look.
B. Adding Texture and Depth:
- Layer multiple halftone effects with varying dot sizes to add texture and depth to your design.
- Experiment with blending modes to enhance the interaction between different halftone layers.
C. Creating Color Gradients with Halftones:
- Use gradients in individual color channels to create smooth transitions between colors.
- Apply halftone effects to these gradients for a seamless and visually striking result.
V. Enhancing Color Halftone Effects with Filters:
A. Gaussian Blur for Softening:
- Apply a Gaussian Blur to the halftone layers to soften the edges of the dots.
- Experiment with different blur radii to achieve the desired level of softness.
B. Unsharp Mask for Sharpness:
- Use the Unsharp Mask filter to enhance the sharpness and clarity of halftone dots.
- Adjust the Amount, Radius, and Threshold settings for optimal results.
VI. Creating Color Halftone Patterns:
A. Custom Halftone Patterns:
- Design custom halftone patterns using vector shapes or brushes.
- Apply these patterns selectively to different areas of your image for a more controlled and artistic effect.
B. Pattern Overlay:
- Use the Pattern Overlay layer style to apply custom halftone patterns to your image.
- Experiment with blending modes and opacity for creative and unique results.
VII. Saving and Exporting Your Color Halftone Design:
A. Save Your Photoshop Document:
- Save your work in the native Photoshop (.PSD) format to retain layers and editable elements.
- This allows for future adjustments and refinements.
B. Exporting for Print or Web:
- When preparing for print, export your final design in a high-resolution format such as TIFF or PDF.
- For web use, export in web-friendly formats like JPEG or PNG, balancing quality and file size.
VIII. Tips for Optimal Color Halftone Results:
A. Experimentation is Key:
- Don’t hesitate to experiment with different settings, patterns, and combinations to discover unique and appealing color halftone effects.
- The beauty of color halftoning lies in its versatility and the endless possibilities it offers.
B. Consider the Output Medium:
- Adjust the resolution and size of your image based on the intended output, whether it’s print, digital, or social media.
- Tailor your color halftone effects to suit the characteristics of the chosen medium.
C. Maintain a Balanced Composition:
- Ensure that the color halftone effects complement the overall composition of your design.
- Strive for a harmonious balance between the halftone elements and the other visual elements in your artwork.
IX. Conclusion:
Mastering color halftone effects in Photoshop opens up a realm of creative possibilities, allowing you to infuse your designs with a unique and visually striking aesthetic. From basic techniques to advanced customization, this comprehensive guide has equipped you with the knowledge and tools to elevate your artwork. As you embark on your journey to create captivating color halftone designs, embrace experimentation, push the boundaries of your creativity, and let the vibrant world of halftones enhance the visual impact of your artistic expressions.


