Mastering Disk Management: A Comprehensive Guide to Using the Disk Management Tool in Windows XP
In the realm of computer storage and disk management, effective utilization of disk space, partition management, and disk maintenance are essential for optimizing system performance, organizing data, and ensuring data integrity. Windows XP offers users a powerful built-in tool called Disk Management, designed to facilitate disk-related tasks such as creating partitions, formatting disks, assigning drive letters, and managing volumes. In this comprehensive guide, we’ll delve deep into the intricacies of using the Disk Management tool in Windows XP, empowering users to manage their disk resources with precision, efficiency, and confidence.
Understanding Disk Management in Windows XP:
Before we explore the methods for using the Disk Management tool, it’s essential to understand the purpose and capabilities of this feature within the Windows XP operating system. Disk Management is a comprehensive disk utility that allows users to perform a variety of disk-related tasks, including creating, formatting, deleting, and resizing partitions, initializing disks, assigning drive letters, and managing volumes. Whether setting up a new hard drive, repartitioning existing disks, or troubleshooting disk-related issues, Disk Management provides the necessary tools and functionality to manage disk resources effectively.
Step-by-Step Guide to Using the Disk Management Tool:
Now, let’s explore a systematic approach to using the Disk Management tool in Windows XP:
Step 1: Accessing Disk Management:
- Click on the “Start” button located at the bottom-left corner of the screen.
- Navigate to “Control Panel” and double-click to open it.
- In the Control Panel window, locate and open the “Administrative Tools” icon.
- In the Administrative Tools window, double-click to open the “Computer Management” tool.
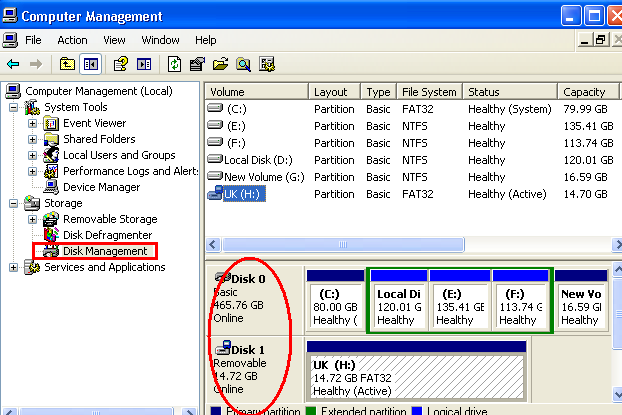
- In the Computer Management window, navigate to “Storage” and click on “Disk Management.”
Step 2: Understanding Disk Layout:
- In the Disk Management window, you’ll see a visual representation of all disks and partitions connected to your computer.
- Disks are listed as numbered disk icons, while partitions are represented as rectangular boxes within each disk.
- Each partition is labeled with information such as partition type, size, file system, and drive letter (if assigned).
Step 3: Performing Disk Operations:
- Right-click on a disk or partition to access a variety of disk management operations.
- Common operations include creating new partitions, formatting partitions, deleting partitions, resizing partitions, changing drive letters, and setting partition properties.
- Follow the on-screen prompts and dialogs to complete each operation, providing necessary parameters such as partition size, file system type, and volume label.
Step 4: Advanced Disk Management Tasks:
- Explore advanced disk management tasks such as converting disk types (e.g., basic to dynamic), extending volumes into unallocated space, shrinking volumes to free up space, and configuring fault-tolerant disk configurations (e.g., RAID).
Step 5: Resolving Disk Issues:
- Use the Disk Management tool to diagnose and resolve disk-related issues such as disk errors, unallocated space, unrecognized disks, and partition alignment problems.
- Check for disk status indicators such as healthy, online, offline, failed, or initializing to identify potential issues with disk health or functionality.
Step 6: Saving Changes and Exiting:
- After performing desired disk management tasks, ensure to save changes by clicking on the “Apply” button located in the toolbar or within the context menu.
- Confirm any prompts or warnings regarding data loss or partition modifications before applying changes.
- Once changes are applied successfully, close the Disk Management window and exit the Computer Management tool.
Advanced Techniques and Tips:
For advanced users or those seeking additional functionality, consider the following tips:
- Command-Line Interface: Windows XP offers command-line utilities such as “diskpart” for performing disk management tasks via the command prompt. Familiarize yourself with command-line syntax and options for greater flexibility and automation.
- Third-Party Disk Management Tools: Explore third-party disk management utilities that offer advanced features, enhanced user interfaces, and additional functionality beyond what’s available in the built-in Disk Management tool.
- Disk Maintenance and Optimization: Regularly perform disk maintenance tasks such as disk defragmentation, disk cleanup, and error checking to optimize disk performance, improve data access speeds, and ensure data integrity.
Conclusion:
In conclusion, the Disk Management tool in Windows XP is a versatile and powerful utility that empowers users to manage disk resources with precision, efficiency, and confidence. By following the step-by-step guide outlined in this article and considering advanced techniques and tips, users can harness the full potential of Disk Management to create, format, resize, and maintain partitions effectively, ensuring optimal disk performance and data organization on their Windows XP systems. Whether setting up new disks, repartitioning existing drives, or troubleshooting disk-related issues, mastering the use of the Disk Management tool enhances the overall reliability, efficiency, and usability of your Windows XP system. So take control of your disk resources today, explore the capabilities of Disk Management, and optimize your disk management experience on Windows XP.


