How to overclock a CPU
Overclocking a CPU involves pushing its clock speed beyond its factory-set limits to achieve higher performance, but it requires careful consideration of hardware capabilities, cooling solutions, and stability testing. This comprehensive guide will walk you through the step-by-step process of overclocking a CPU, covering basic concepts, safety precautions, methods for different CPU brands (Intel and AMD), software tools, stability testing, and troubleshooting tips.
Understanding CPU Overclocking
What is CPU Overclocking?
CPU overclocking involves increasing the clock speed of your processor beyond its default settings to achieve higher performance in tasks that are CPU-bound, such as gaming, video editing, and rendering. Overclocking can boost system responsiveness and improve frame rates in games, but it also increases power consumption and heat generation.
Factors to Consider Before Overclocking
- CPU Cooling: Efficient cooling solutions (air or liquid) are essential to dissipate increased heat generated during overclocking.
- Motherboard Support: Ensure your motherboard supports overclocking features and has robust power delivery components.
- Stability: Overclocking can destabilize your system if not done properly, leading to crashes, data corruption, or hardware damage.
- Warranty: Overclocking may void your CPU warranty; check manufacturer policies before proceeding.
Tools and Utilities for Overclocking
- Intel CPUs: Use Intel Extreme Tuning Utility (XTU) or BIOS/UEFI settings for overclocking.
- AMD CPUs: Use Ryzen Master for AMD Ryzen CPUs or BIOS/UEFI settings for older AMD processors.
- Third-Party Tools: Software like CPU-Z, HWMonitor, and Prime95 for monitoring and stress testing.
Step-by-Step Guide to Overclocking a CPU
Step 1: Prepare Your System
- Update BIOS/UEFI: Ensure your motherboard BIOS or UEFI firmware is up to date for compatibility and stability improvements.
- Check Cooling: Install an adequate cooling solution (air or liquid) to manage increased heat from overclocking.
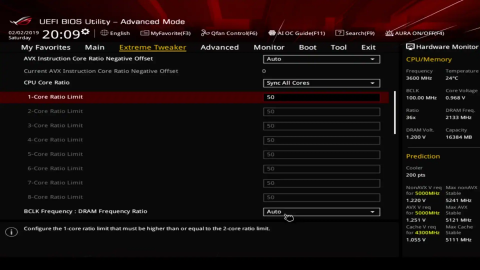
Step 2: Overclocking in BIOS/UEFI (Basic Input/Output System/Unified Extensible Firmware Interface)
Intel CPUs
- Enter BIOS/UEFI: Restart your computer and press the designated key (e.g., Del, F2, F10) during boot to enter BIOS/UEFI settings.
- Adjust CPU Multiplier: Increase the CPU multiplier (core ratio) in small increments (e.g., +1) for gradual overclocking.
- Adjust Voltage: Increase CPU core voltage (Vcore) if stability issues occur during stress testing.
- Adjust Other Settings: Modify settings like CPU cache ratio, CPU power limits, and RAM frequency/timings for optimal performance.
- Save and Exit: Save changes and exit BIOS/UEFI; the system will restart with new settings.
AMD CPUs
- Enter BIOS/UEFI: Restart your computer and press the designated key (e.g., Del, F2, F10) during boot to enter BIOS/UEFI settings.
- Adjust CPU Multiplier: Increase the CPU multiplier (clock ratio) in small increments (e.g., +0.25) for gradual overclocking.
- Adjust Voltage: Increase CPU core voltage (Vcore) if stability issues occur during stress testing.
- Adjust Other Settings: Modify settings like RAM frequency/timings, CPU power limits, and CPU load-line calibration.
- Save and Exit: Save changes and exit BIOS/UEFI; the system will restart with new settings.
Step 3: Stress Testing and Stability Checks
- Use Stress Testing Software: Run stress testing software like Prime95, Intel XTU Benchmark, or AIDA64 to test CPU stability under load.
- Monitor Temperatures: Use monitoring tools (e.g., HWMonitor, Core Temp) to monitor CPU temperatures during stress testing.
- Adjust Settings: If instability or overheating occurs, revert overclocking settings or adjust CPU voltage and multiplier for stability.
Step 4: Benchmarking and Performance Monitoring
- Run Benchmarks: Use benchmarking tools (e.g., Cinebench, 3DMark) to measure performance gains from overclocking.
- Monitor Performance: Monitor system performance and temperatures during real-world tasks to ensure stability and reliability.
Step 5: Maintenance and Monitoring
- Regular Maintenance: Clean dust from cooling components regularly to maintain optimal cooling efficiency.
- Monitor Temperatures: Continuously monitor CPU temperatures and system stability after overclocking.
Overclocking Safety Precautions
- Temperature Monitoring: Keep CPU temperatures below manufacturer-recommended limits to prevent overheating and thermal throttling.
- Voltage Limitations: Avoid excessive voltage increases to prevent CPU degradation or damage.
- Incremental Adjustments: Make small adjustments to clock speeds and voltages for gradual overclocking and stability testing.
- Backup and Restore: Save stable BIOS/UEFI profiles and backups to revert settings if instability or issues arise.
Troubleshooting Overclocking Issues
- System Instability: Revert overclocking settings or lower clock speeds/voltages if system crashes or becomes unstable.
- Heat Management: Improve cooling solutions or adjust fan speeds to reduce CPU temperatures during overclocking.
- Component Compatibility: Ensure all components (CPU, motherboard, RAM) are compatible and capable of handling overclocked speeds.
Conclusion
Overclocking a CPU can provide significant performance gains for demanding tasks but requires careful consideration of hardware capabilities, cooling solutions, and stability testing procedures. By following the steps outlined in this guide and using appropriate tools and utilities for your CPU brand (Intel or AMD), you can safely overclock your CPU to achieve higher performance while maintaining system stability and reliability. Regularly monitor temperatures, stress test your system, and follow best practices to ensure a successful and safe overclocking experience. If unsure about specific settings or encountering issues, consult manufacturer guidelines, seek advice from experienced users, or refer to online resources for additional guidance on CPU overclocking.


