How to format a USB drive
Formatting a USB drive is a fundamental process that prepares the storage device for data storage and ensures compatibility across different systems. Whether you’re preparing a USB drive for storage, troubleshooting issues, or changing its file system, here’s a comprehensive guide on how to format a USB drive:
Introduction to Formatting a USB Drive
- Purpose of Formatting
- Explanation of why formatting is necessary for USB drives
- Benefits of formatting (data organization, compatibility with different systems)
- Types of Formatting
a. Quick Format
- Definition of quick format and its advantages
- When to use quick format for faster preparation of the USB drive
b. Full Format
- Explanation of full format process and its thoroughness
- Situations where full format is recommended (data security, resolving errors)
- Choosing File Systems
a. File System Types
- Overview of common file systems (FAT32, exFAT, NTFS)
- Differences between file systems in terms of compatibility and features
Steps to Format a USB Drive
- Inserting USB Drive
a. Connecting the USB Drive
- Inserting the USB drive into an available USB port on the computer
- Ensuring the USB drive is properly recognized by the operating system
- Accessing Disk Management (Windows)
a. Opening Disk Management
- Right-clicking on the Start menu and selecting “Disk Management”
- Finding the USB drive listed under “Disk Drives”
- Formatting Using Disk Management
a. Selecting the USB Drive
- Right-clicking on the USB drive in Disk Management
- Choosing “Format…” from the context menu
b. Choosing File System and Allocation Unit Size
- Selecting desired file system (FAT32, exFAT, NTFS) from the format window
- Adjusting allocation unit size if necessary (default allocation recommended for most users)
c. Performing the Format
- Naming the volume (optional) and checking “Quick Format” if preferred
- Clicking “OK” and then “OK” again to confirm the formatting process
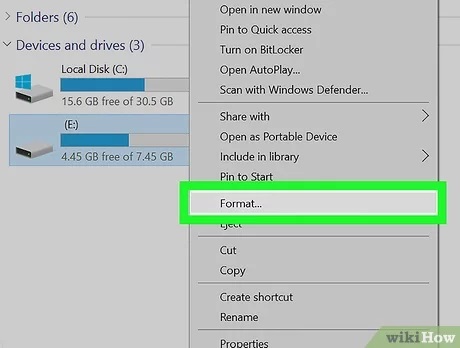
- Formatting Using File Explorer (Windows)
a. Accessing File Explorer
- Opening File Explorer by clicking on the folder icon in the taskbar or pressing Win + E
- Locating the USB drive under “This PC” or “Computer”
b. Right-click Formatting
- Right-clicking on the USB drive and selecting “Format…”
- Choosing file system type (FAT32, exFAT, NTFS) and allocation unit size
- Clicking “Start” to initiate the formatting process
- Formatting Using Disk Utility (macOS)
a. Opening Disk Utility
- Launching Disk Utility from the Applications folder or using Spotlight search (Cmd + Space)
- Selecting the USB drive from the list of devices in Disk Utility
b. Erasing the USB Drive
- Clicking on the “Erase” button in Disk Utility
- Choosing file system format (Mac OS Extended, exFAT, FAT32) and scheme (GUID Partition Map for macOS)
c. Confirming Erase
- Naming the USB drive (optional) and clicking “Erase” to confirm the formatting process
- Waiting for Disk Utility to complete the format and ejecting the USB drive once done
- Formatting Using Terminal (macOS)
a. Accessing Terminal
- Launching Terminal from the Applications folder or using Spotlight search (Cmd + Space)
- Typing
diskutil listto identify the USB drive and its identifier (e.g., disk2)
b. Executing Format Command
- Typing
diskutil eraseDisk [File System] [Name] /dev/diskX(replace [File System], [Name], and diskX with appropriate values) - Pressing Enter to execute the command and waiting for Terminal to complete the format process
Troubleshooting and Tips
- Handling Format Errors
a. Resolving Format Errors
- Troubleshooting common format errors (drive not recognized, format failure)
- Checking USB drive for physical damage or using another computer for formatting
- Data Backup
a. Backing Up Important Data
- Safeguarding data on the USB drive before formatting
- Using cloud storage or external hard drives for backup
- Safely Ejecting USB Drive
a. Ejecting USB Drive
- Right-clicking on the USB drive in File Explorer (Windows) or Finder (macOS)
- Selecting “Eject” to safely remove the USB drive after formatting
Conclusion
Formatting a USB drive is a straightforward process that prepares it for storing data, ensuring compatibility, and resolving potential issues. By following this comprehensive guide, users can successfully format their USB drives using various methods on Windows and macOS, optimizing their usability and performance.


