Performing a Clean Install of Windows 10: A Comprehensive Guide to a Fresh Start
Introduction: A clean install of Windows 10 is often necessary when upgrading to a new operating system, fixing persistent issues, or optimizing system performance. Unlike an upgrade installation that retains existing files and settings, a clean install wipes the slate clean, installing a fresh copy of Windows 10 without any residual data or settings from previous installations. While it may seem daunting, performing a clean install of Windows 10 is a straightforward process that can breathe new life into your PC and ensure optimal performance. In this comprehensive guide, we’ll walk you through each step of the process, empowering you to perform a clean install of Windows 10 with confidence and ease.
Step 1: Preparation Before embarking on a clean install of Windows 10, it’s essential to take the necessary precautions and gather the required resources. Here’s what you’ll need:
- Windows 10 Installation Media: You’ll need a bootable USB drive or DVD containing the Windows 10 installation files. You can create installation media using the Media Creation Tool provided by Microsoft.
- Backup Your Data: Since a clean install will erase all existing data on your system drive, it’s crucial to back up any important files, documents, and media to an external storage device or cloud service.
- Product Key: If you’re reinstalling Windows 10 on a system that previously had it installed, you may not need to enter a product key. However, if you’re installing Windows 10 on a new PC or upgrading from a previous version of Windows, you’ll need a valid product key.
- Drivers and Software: Make a list of hardware drivers and essential software programs you’ll need after the clean install. You can download the latest drivers from your computer manufacturer’s website.
Step 2: Boot from Installation Media Once you’ve prepared the necessary resources, it’s time to boot your computer from the Windows 10 installation media. Here’s how to do it:
- Insert the bootable USB drive or DVD containing the Windows 10 installation files into your computer.
- Restart your computer and enter the BIOS or UEFI settings by pressing the designated key (usually Del, F2, or F12) during the boot process.
- In the BIOS or UEFI settings, navigate to the Boot menu and set the boot priority to boot from the installation media first.
- Save the changes and exit the BIOS or UEFI settings. Your computer will now boot from the Windows 10 installation media.
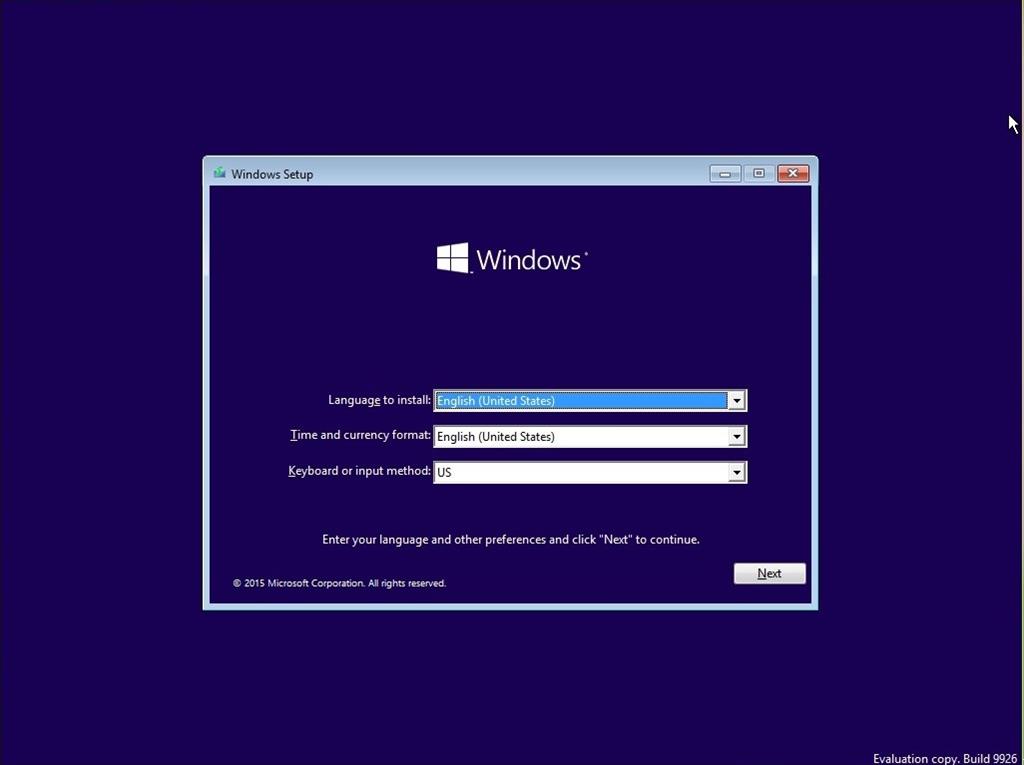
Step 3: Install Windows 10 With the computer booted from the installation media, you’re ready to begin the clean install of Windows 10. Follow these steps:
- Select Language, Time, and Keyboard Preferences: Choose your desired language, time format, and keyboard layout, then click “Next.”
- Click “Install Now”: On the Windows Setup screen, click the “Install Now” button to start the installation process.
- Enter Product Key (if prompted): If prompted, enter your Windows 10 product key. You may also choose to skip this step and enter the product key later.
- Accept License Terms: Read and accept the Microsoft Software License Terms, then click “Next.”
- Choose Installation Type: Select “Custom: Install Windows only (advanced)” to perform a clean install.
- Select Drive and Partition: Choose the drive and partition where you want to install Windows 10. If you have multiple drives or partitions, select the one you want to use for the clean install and click “Next.”
- Begin Installation: Windows will now begin the installation process. It may take some time to copy files and install Windows 10.
- Set Up Windows: Once the installation is complete, your computer will restart, and you’ll be prompted to set up Windows 10. Follow the on-screen instructions to configure your preferences, such as region, language, user account, and network settings.
- Install Drivers and Software: After Windows 10 is installed, you’ll need to install drivers for your hardware components, such as graphics cards, network adapters, and sound cards. You can download the latest drivers from your computer manufacturer’s website or use Windows Update to install them automatically. Additionally, reinstall any essential software programs you backed up earlier.
- Restore Data: Finally, transfer your backed-up data, files, and settings back to your computer. You can copy them from your external storage device or restore them from a cloud backup service.
Conclusion: Performing a clean install of Windows 10 is a relatively straightforward process that can help optimize system performance, fix persistent issues, and ensure a fresh start for your computer. By following the steps outlined in this guide and taking the necessary precautions, you can perform a clean install with confidence and ease. Remember to back up your data, gather the required resources, and follow each step carefully to achieve a successful installation. With a clean install of Windows 10, you can enjoy a smoother and more efficient computing experience, free from clutter and unnecessary baggage.