Mastering the Art of Printer Integration: A Comprehensive Guide to Adding a Printer in Windows 10
Introduction
The seamless integration of printers into the Windows 10 operating system is a crucial aspect of a productive and efficient computing experience. Whether you’re setting up a new printer, replacing an old one, or connecting to a networked printer, Windows 10 provides a user-friendly interface for printer management. In this extensive guide, we will delve into the step-by-step process of adding a printer in Windows 10, exploring various connection methods, troubleshooting common issues, and unlocking the full potential of your printing capabilities.
Understanding Printer Connection Options
Windows 10 supports a variety of printer connection methods, catering to the diverse range of printers available in the market. Before diving into the process of adding a printer, it’s essential to understand the different connection options:
- USB Connection: The most straightforward method involves connecting the printer directly to your computer using a USB cable. This is a common approach for personal printers and is typically a plug-and-play process.
- Wireless Connection: Printers equipped with wireless capabilities allow for a cable-free connection to your Windows 10 device. This method is convenient for those who prefer a clutter-free workspace and enables printing from multiple devices connected to the same network.
- Network Connection: Networked printers are connected to a local network, allowing multiple users to access the printer from different devices. Windows 10 facilitates the discovery and connection to networked printers seamlessly.
- Bluetooth Connection: Some printers support Bluetooth connectivity, enabling a wireless connection between your Windows 10 device and the printer. This is a viable option for users seeking a wireless setup without relying on Wi-Fi.
- Cloud Printing: Cloud-based printing services, such as Google Cloud Print or Microsoft Print to PDF, provide the ability to print documents remotely. Windows 10 integrates with various cloud services to enhance printing flexibility.
The Step-by-Step Guide to Adding a Printer in Windows 10
Now, let’s explore the detailed process of adding a printer in Windows 10. This guide encompasses various connection methods, ensuring that users can choose the approach that best suits their printer and preferences.
Method 1: Adding a USB-Connected Printer
- Connect the Printer:
- Ensure that your printer is powered on.
- Connect the printer to your Windows 10 computer using a USB cable.
- Open Settings:
- Click on the Start menu and select “Settings” (gear-shaped icon).
- Navigate to Devices:
- In the Settings window, select “Devices.”
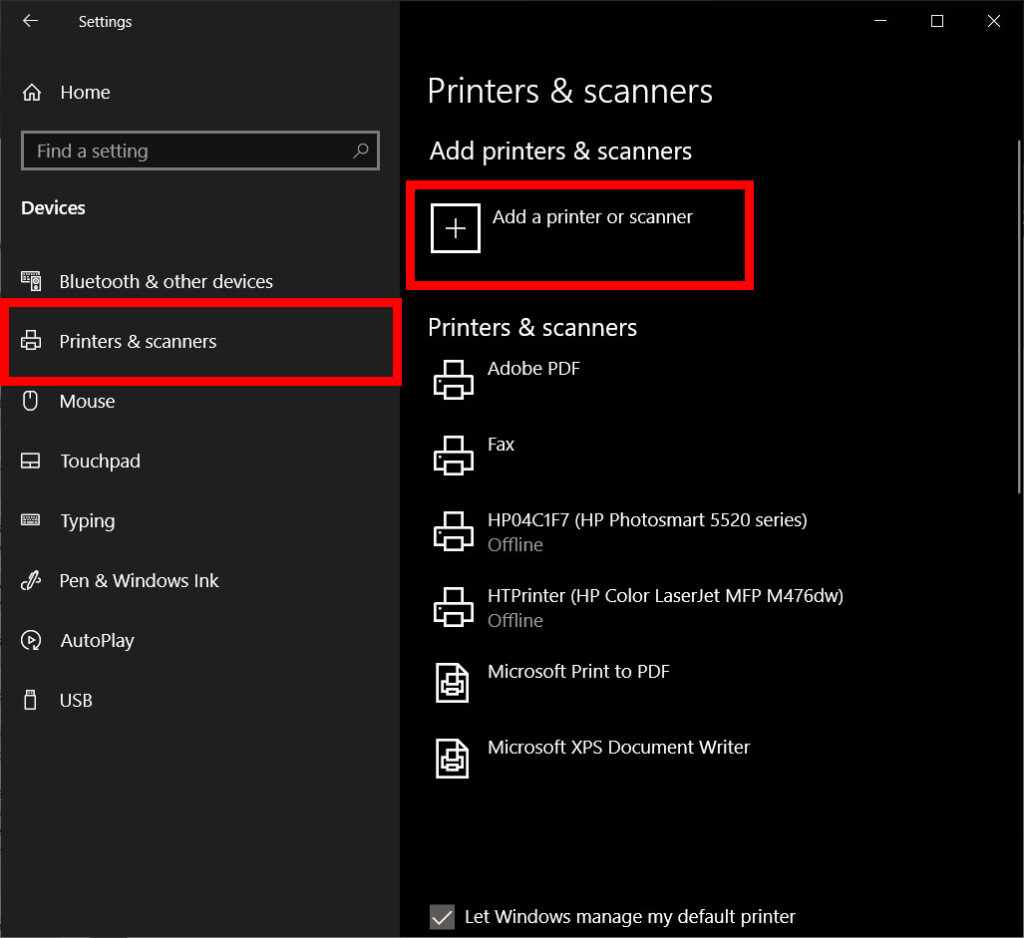
- Click on Printers & Scanners:
- In the Devices menu, click on “Printers & scanners” in the left sidebar.
- Add a Printer:
- Click on the “Add a printer or scanner” button.
- Select Your Printer:
- Windows 10 will automatically detect the connected printer. Click on your printer’s name when it appears in the list.
- Complete the Setup:
- Follow the on-screen prompts to complete the setup process. Windows 10 will install the necessary drivers, and your printer will be ready for use.
Method 2: Adding a Wireless or Network Printer
- Turn on the Printer:
- Ensure that your wireless or network printer is powered on.
- Open Settings:
- Click on the Start menu and select “Settings.”
- Navigate to Devices:
- In the Settings window, select “Devices.”
- Click on Printers & Scanners:
- In the Devices menu, click on “Printers & scanners” in the left sidebar.
- Add a Printer:
- Click on the “Add a printer or scanner” button.
- Select Your Printer:
- If your wireless or network printer is detected, it will appear in the list. Click on its name to proceed.
- Complete the Setup:
- Follow the on-screen instructions to complete the setup. Windows 10 will install the necessary drivers, and your wireless or network printer will be added successfully.
Method 3: Adding a Printer via Bluetooth
- Turn on Bluetooth:
- Ensure that Bluetooth is enabled on both your Windows 10 device and the printer.
- Open Settings:
- Click on the Start menu and select “Settings.”
- Navigate to Devices:
- In the Settings window, select “Devices.”
- Click on Bluetooth & other devices:
- In the Devices menu, click on “Bluetooth & other devices” in the left sidebar.
- Turn on Bluetooth:
- Ensure that Bluetooth is turned on.
- Add a Bluetooth Device:
- Click on “Add Bluetooth or other device.”
- Select “Bluetooth” from the options.
- Select Your Printer:
- Windows 10 will search for Bluetooth devices. When your printer appears in the list, click on its name to establish the connection.
- Complete the Setup:
- Follow any additional prompts to complete the Bluetooth setup. Once connected, your printer will be available for printing.
Method 4: Adding a Cloud Printer
- Ensure Cloud Printer Compatibility:
- Confirm that your printer supports cloud printing services or is compatible with cloud-enabled features.
- Open Settings:
- Click on the Start menu and select “Settings.”
- Navigate to Devices:
- In the Settings window, select “Devices.”
- Click on Printers & Scanners:
- In the Devices menu, click on “Printers & scanners” in the left sidebar.
- Add a Printer:
- Click on the “Add a printer or scanner” button.
- Select a Cloud-Enabled Printer:
- If your cloud-enabled printer is detected, it will appear in the list. Click on its name to proceed.
- Complete the Setup:
- Follow any additional prompts to complete the cloud printer setup. Once configured, your cloud-enabled printer will be ready for use.
Troubleshooting Common Issues
While the process of adding a printer in Windows 10 is generally straightforward, users may encounter occasional challenges. Here are some common issues and troubleshooting steps:
- Driver Issues:
- If Windows 10 fails to automatically install the necessary drivers, visit the printer manufacturer’s website to download and install the latest drivers for your specific printer model.
- Network Connection Problems:
- Ensure that your computer and the printer are connected to the same network. If using a wireless or networked printer, check network settings and reconnect if necessary.
- Bluetooth Connectivity:
- If experiencing issues with Bluetooth connectivity, ensure that Bluetooth is properly enabled on both devices. Try restarting both the computer and the printer before attempting to connect again.
- Cloud Printing Configuration:
- For cloud-enabled printers, verify that the printer is configured to work with your chosen cloud service. Follow the printer manufacturer’s instructions for cloud printing setup.
Conclusion: Harnessing the Power of Printing in Windows 10
Adding a printer in Windows 10 is a fundamental skill that empowers users to harness the full potential of their computing experience. Whether you’re connecting a USB printer, setting up a wireless device, or exploring cloud printing capabilities, Windows 10 provides a user-friendly interface that caters to diverse needs.
By understanding the various connection methods, following step-by-step guides, and troubleshooting common issues, users can seamlessly integrate printers into their Windows 10 environment. As technology continues to evolve, Windows 10 ensures that users can effortlessly navigate the world of printing, bringing efficiency, convenience, and innovation to their daily computing tasks.