Mastering Precision: Correcting Perspective Distortions in CorelDRAW
Introduction:
CorelDRAW, a versatile graphic design software, empowers users to bring their creative visions to life. One common challenge designers face is correcting perspective distortions in images, ensuring accurate representation and maintaining visual coherence. In this extensive guide, we will delve into the intricacies of correcting perspective distortions in CorelDRAW, offering step-by-step instructions, advanced techniques, and practical applications to help designers overcome this challenge and achieve professional and visually appealing results.
Section 1: Understanding Perspective Distortions
- What are Perspective Distortions:
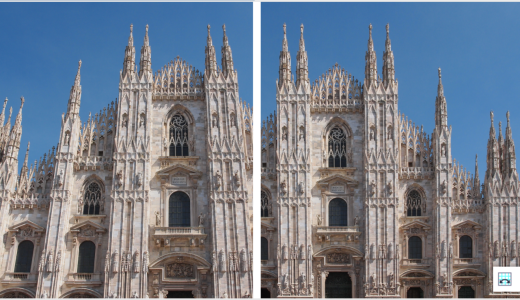
- Perspective distortions occur when objects in an image appear skewed or distorted due to the angle from which the photo was taken.
- Common Causes:
- Perspective distortions often result from photographing objects at an angle, especially in architectural or urban photography.
- Importance of Correction:
- Correcting perspective distortions is essential for accurate representation, maintaining realism, and ensuring a professional and polished look.
Section 2: Step-by-Step Guide on Correcting Perspective Distortions in CorelDRAW
- Open CorelDRAW:
- Launch CorelDRAW and open the document containing the image with perspective distortions.
- Select the Image:
- Use the Pick tool to select the image you want to correct.
- Access the ‘Effects’ Menu:
- Navigate to the “Effects” menu and select “Adjust” to reveal options for correcting distortions.
- Choose ‘Perspective Correction’:
- Within the “Adjust” menu, choose “Perspective Correction.” CorelDRAW will display control handles on the corners of the image.
- Adjust Control Handles:
- Drag the control handles to match the perspective lines in the image. Typically, align them with prominent lines or edges that should be parallel.
- Finalize the Correction:
- Press “Enter” or click outside the image to finalize the correction. CorelDRAW will apply the perspective correction, straightening lines and aligning elements.
Section 3: Advanced Techniques and Considerations
- Fine-Tune with Guidelines:
- Enable guidelines and align them with key elements in the image for more precise adjustments.
- Custom Perspective Correction:
- Use the “Skew” and “Rotate” tools for custom adjustments. This provides more control over specific distortions.
- Masking Techniques:
- Combine perspective correction with masking to isolate specific areas for correction while leaving others untouched.
- Multiple Corrections in a Single Image:
- For complex images with multiple perspective distortions, consider applying corrections in stages, focusing on different areas separately.
Section 4: Practical Applications and Use Cases
- Architectural Photography:
- Correct distortions in images of buildings and structures to ensure accurate and realistic representations.
- Product Photography:
- Present products accurately by correcting distortions in images, especially for e-commerce platforms.
- Urban and Street Photography:
- Ensure straight lines in urban landscapes and street scenes, maintaining visual coherence and professionalism.
- Interior Design Renderings:
- Correct perspective distortions in interior design mockups for realistic and compelling presentations.
Section 5: Best Practices and Tips
- Use Reference Lines:
- Identify and use existing lines or elements in the image as reference points for accurate corrections.
- Maintain Realism:
- While correcting distortions, strive to maintain a natural and realistic look in the final image.
- Experiment with Multiple Tools:
- Explore the various tools in CorelDRAW, such as “Skew” and “Rotate,” to find the most efficient method for each correction.
- Regularly Save Progress:
- Save your work at different stages of correction to avoid loss of data and facilitate easy recovery if needed.
Conclusion:
Correcting perspective distortions in CorelDRAW is a valuable skill that enhances the precision and professionalism of your designs. This comprehensive guide has equipped you with the knowledge and techniques to seamlessly correct distortions, ensuring your visual compositions are not only aesthetically pleasing but also accurately represent the intended perspective. As you integrate these practices into your design workflow, you’ll find that the ability to correct perspective distortions enhances your creative capabilities, allowing you to present images with clarity and realism.