Illuminating the Night: A Comprehensive Guide to Crafting the Blue Night Effect in Lightroom
Introduction:
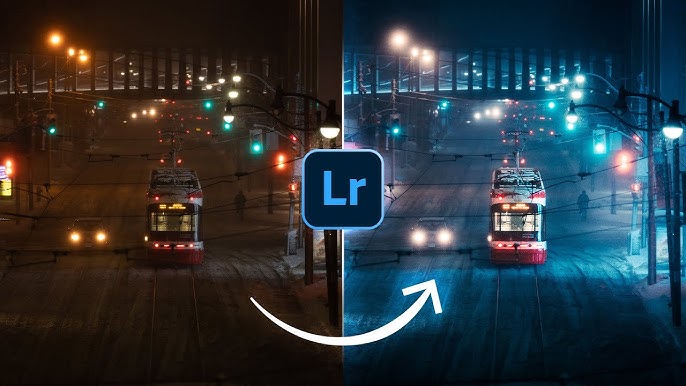
Step into the mystique of moonlit landscapes and urban cityscapes as we unveil the secrets of creating the captivating Blue Night Effect in Adobe Lightroom. This comprehensive tutorial is tailored for photographers and digital artists seeking to master the art of infusing their nighttime images with a cool and enchanting ambiance. The Blue Night Effect, characterized by deep blue tones and a sense of serene atmosphere, adds a touch of magic to photographs taken under the moon’s gentle glow. Join us on this journey as we explore the step-by-step process of achieving this mesmerizing effect, unlocking the potential to transform your night shots into evocative and visually stunning masterpieces.
I. Understanding the Blue Night Effect:
Before delving into the tutorial, let’s establish a foundational understanding of the Blue Night Effect:
A. Moonlit Serenity:
- Recognize the Blue Night Effect as a technique to enhance the serenity of moonlit scenes.
- Understand how this aesthetic choice imparts a cool and calm atmosphere to nighttime photography.
B. Embracing the Blue Palette:
- Appreciate the use of deep blue tones in creating a cohesive and visually appealing night effect.
- Explore how this color choice contributes to a sense of tranquility and mystery in nighttime images.
C. Versatility in Night Photography:
- Acknowledge the versatility of the Blue Night Effect across various night photography genres.
- Understand how this technique can be applied to landscapes, cityscapes, and astrophotography for a unified and enchanting look.
II. Importing and Preparing Night Images:
Begin your journey to the Blue Night Effect by selecting and preparing your nighttime images:
A. Choosing Appropriate Night Shots:
- Select images taken during moonlit nights with a prominent presence of blue hues.
- Ensure your image selection provides a suitable canvas for the application of the Blue Night Effect.
B. Importing into Lightroom:
- Launch Adobe Lightroom and import your selected nighttime images.
- Create a dedicated catalog or use an existing one to organize and initiate the process of crafting the Blue Night Effect.
III. Understanding Lightroom Develop Module:
Before diving into the tutorial, familiarize yourself with the essential tools in the Lightroom Develop module:
A. White Balance Adjustments:
- Explore white balance adjustments to set the overall color temperature.
- Understand how modifying the white balance contributes to achieving the desired blue tones.
B. Tone Curve and HSL Adjustments:
- Learn how the Tone Curve panel and HSL adjustments impact tonal variations and color hues.
- Recognize the significance of these adjustments in crafting the Blue Night Effect.
C. Graduated and Radial Filters:
- Understand the versatility of graduated and radial filters in controlling exposure and focus.
- Explore how these tools can be leveraged for enhancing specific areas within the nighttime images.
IV. Crafting the Blue Night Effect:
Initiate the process of creating the Blue Night Effect with these step-by-step instructions:
A. Setting the White Balance:
- Navigate to the White Balance settings in the Lightroom Develop module.
- Adjust the temperature slider towards the cooler tones, emphasizing blue hues.
B. Tonal Adjustments with the Tone Curve:
- Access the Tone Curve panel and create a gentle S-curve to enhance contrast.
- Adjust the individual color channels in the Tone Curve to fine-tune the balance of blue tones.
C. Enhancing Blue Tones with HSL:
- Enter the HSL (Hue, Saturation, Luminance) panel.
- Adjust the Blue and Aqua sliders to intensify and refine the blue tones in the image.
D. Graduated Filter for Sky Enhancement:
- Apply a Graduated Filter to enhance the sky.
- Adjust exposure, temperature, and tint within the Graduated Filter to intensify the blue effect in the upper part of the image.
E. Radial Filters for Focal Points:
- Use Radial Filters to highlight specific areas or subjects.
- Adjust exposure, clarity, and temperature within Radial Filters to draw attention to focal points while maintaining the overall Blue Night Effect.
F. Softening Shadows and Highlights:
- Apply gentle adjustments to soften shadows and highlights.
- Use techniques like the Soften Skin preset or manual adjustments to create a balanced and visually appealing overall look.
V. Fine-Tuning and Iterative Refinement:
Refine your Blue Night Effect through iterative adjustments and meticulous fine-tuning:
A. Reviewing the Entire Image:
- Zoom out to assess the overall impact of the Blue Night Effect.
- Ensure a cohesive and harmonious look across the entire image.
B. Selective Adjustments:
- Use the Adjustment Brush or Graduated Filter for selective adjustments.
- Refine specific areas that may need additional attention or customization.
C. Dynamic Adjustments Based on Content:
- Consider the content of each image when making dynamic adjustments.
- Tailor your Blue Night Effect to complement the unique features of the scene or subject matter.
VI. Real-World Applications: Showcasing Blue Night Photography:
Share your Blue Night Effect images with the world through various platforms and formats:
A. Online Galleries and Portfolios:
- Showcase your Blue Night photographs on online platforms like Behance or personal portfolios.
- Provide context and descriptions to enhance viewers’ understanding of your creative process.
B. Social Media Platforms:
- Share your Blue Night images on platforms like Instagram, Twitter, or Facebook.
- Engage with your audience, encouraging them to explore the enchanting world of nighttime photography.
C. Printed Artwork:
- Consider printing your Blue Night images as posters or art prints.
- Explore opportunities to exhibit your work in physical galleries or themed art events.
VII. Tips for Blue Night Excellence:
Optimize your creative process with these practical tips for achieving excellence in the Blue Night Effect:
A. Balancing Blue Tones:
- Strive for a balanced distribution of blue tones throughout the image.
- Ensure that the Blue Night Effect enhances the atmosphere without overwhelming the visual narrative.
B. Embracing Natural Moonlight:
- Capture or enhance images taken under natural moonlight.
- Embrace the magic of moonlit nights to enhance the authenticity of your Blue Night photographs.
C. Consistent Atmosphere:
- Maintain a consistent atmosphere across your Blue Night images.
- Establish a signature style that aligns with your personal or brand aesthetic.
D. Experimentation with Luminance:
- Experiment with luminance adjustments in the HSL panel.
- Fine-tune luminance settings to control the brightness of specific colors and create nuanced effects.
VIII. Conclusion:
Creating the Blue Night Effect in Adobe Lightroom is a journey into the realms of nighttime enchantment and visual storytelling. As you navigate the intricacies of white balance adjustments, tone curve enhancements, and selective filtering, remember that each adjustment contributes to the overall mood and atmosphere of your nighttime composition. May your Blue Night photographs transport viewers into a world of tranquility, mystery, and moonlit magic. Embrace the versatility of this technique, celebrate the fusion of deep blue tones, and may your mastery of the Blue Night Effect shine through in your creative endeavors. May your photographs inspire others to explore the enchanting beauty of nighttime scenes and embark on their own journeys of artistic expression through the captivating lens of moonlit serenity.