Mastering the Art of Photo Editing for Windows 10 Backgrounds: A Comprehensive Guide

Introduction:
Personalizing your Windows 10 experience extends beyond customizing settings and themes; it’s about transforming your desktop background into a canvas that reflects your style and preferences. This comprehensive guide explores the art of editing photos to fit seamlessly as backgrounds in Windows 10. From selecting the perfect image to mastering editing tools, we’ll navigate the intricacies of creating stunning and personalized desktop backgrounds.
Section 1: Selecting the Perfect Image
1.1 Resolution Matters:
- Start by choosing high-resolution images. Windows 10 supports a variety of resolutions, so opt for images with clarity and detail to ensure they look crisp on your desktop.
1.2 Consider Aspect Ratio:
- Windows 10 backgrounds often look best when they match the aspect ratio of your monitor. Common ratios include 16:9 and 16:10. Ensure your selected image aligns with your monitor’s specifications for optimal display.
Section 2: Preparing Images for Windows 10 Backgrounds
2.1 Basic Cropping Techniques:
- Windows 10 allows for easy cropping of images. Use built-in tools or external software to crop your chosen image to fit your desktop dimensions perfectly.
2.2 Resolution Adjustment:
- If needed, adjust the image resolution to match your monitor’s native resolution. This step ensures that the image doesn’t appear distorted or pixelated when set as your desktop background.
Section 3: Enhancing Colors and Contrast
3.1 Color Correction:
- Use photo editing software to correct colors. Enhance or tone down specific hues to achieve the desired visual effect. Ensure that the colors complement your desktop icons and are visually appealing.
3.2 Contrast and Brightness:
- Adjust contrast and brightness to create a visually balanced background. Striking the right balance ensures that your desktop icons remain visible while still showcasing the beauty of the image.
Section 4: Adding Filters and Effects
4.1 Creative Filters:
- Experiment with creative filters to add artistic flair to your background. Sepia tones, black and white, or vintage filters can transform an ordinary image into a unique and visually striking desktop background.
4.2 Blur and Focus:
- Employ blur effects strategically to highlight specific elements of the image. This technique can create a sense of depth and draw attention to the focal point while providing a clean background for desktop icons.
Section 5: Incorporating Personal Touches
5.1 Overlay Text or Graphics:
- For a personalized touch, consider overlaying meaningful text or graphics onto your background. Use elegant fonts and subtle colors to add quotes, dates, or any elements that hold significance for you.
5.2 Watermarks and Signatures:
- If you’re using your own photographs, consider adding a discreet watermark or signature. This not only protects your work but also adds a professional touch to your desktop background.
Section 6: Saving and Exporting
6.1 File Format Considerations:
- Save your edited image in a suitable file format. JPEG is a common choice for photographs, while PNG is ideal for images with transparency. Consider the balance between file size and image quality.
6.2 Naming Convention:
- Adopt a systematic naming convention for your background images. This makes it easier to organize and locate specific backgrounds when you want to switch or update them.
Section 7: Applying Your Edited Image as a Windows 10 Background
7.1 Accessing Personalization Settings:
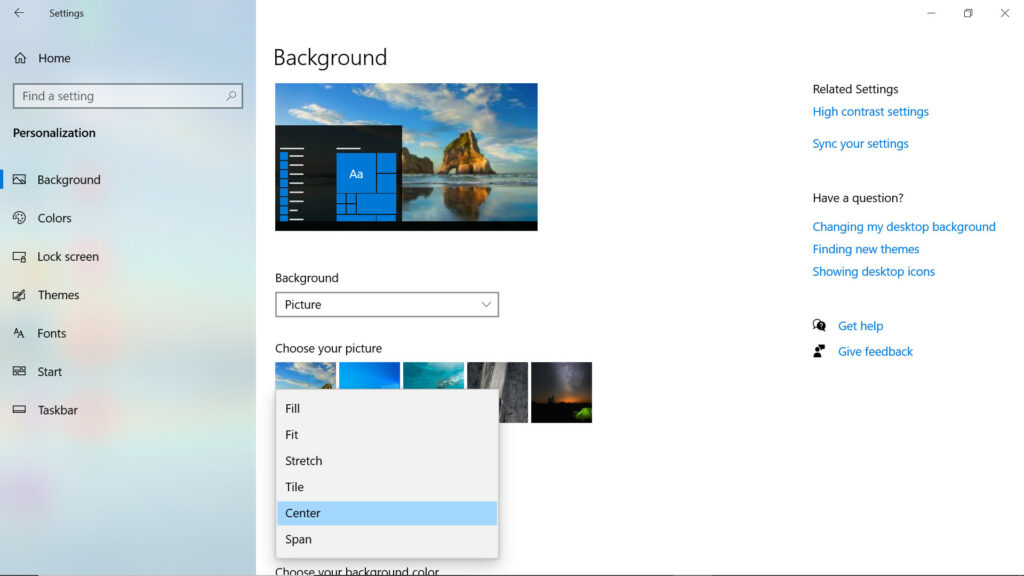
- Open the “Settings” menu on Windows 10, navigate to “Personalization,” and select “Background.” Here, you can choose your edited image from the list or browse your computer for the file.
7.2 Adjusting Background Settings:
- Experiment with background settings such as fit, fill, stretch, or tile to see which one suits your edited image best. Windows 10 offers these options to customize how the image appears on your desktop.
Section 8: Advanced Tips for Power Users
8.1 Dynamic Desktops:
- Explore third-party applications that offer dynamic desktop features. These tools can change your background throughout the day or in response to specific triggers, providing a dynamic and ever-changing visual experience.
8.2 Multi-Monitor Configurations:
- If you use multiple monitors, tailor your image editing to ensure a seamless transition across screens. Consider panoramic images or edit separate images for each monitor to create a cohesive visual experience.
Conclusion: Crafting a Desktop Masterpiece
As you embark on the journey of editing photos for Windows 10 backgrounds, remember that personalization is the key. Whether you choose vibrant landscapes, cherished memories, or abstract art, the process of editing and selecting the perfect image is an art form. Your desktop background is a canvas waiting for your creative touch, reflecting your personality and enhancing your overall computing experience. Embrace the tools, experiment with techniques, and let your desktop become a masterpiece that inspires and resonates with you every time you log in. Welcome to the world of personalized desktop aesthetics, where every click and edit transforms your computer into a digital gallery of your own creation.


