Capturing Moments: A Comprehensive Guide to Taking Screenshots on PC
Screenshots are invaluable tools for capturing and sharing information, whether it’s a funny meme, an important document, or a memorable moment in a video game. For PC users, taking screenshots is a fundamental skill that can be useful in a wide range of scenarios. Whether you’re a seasoned professional or a novice user, mastering the art of screenshotting can greatly enhance your productivity and communication abilities. In this comprehensive guide, we’ll explore various methods and techniques for taking screenshots on PC, covering both Windows and macOS platforms, as well as providing tips for editing and sharing your screenshots effectively.
1. Understanding the Basics:
Before diving into the specific methods for taking screenshots on PC, it’s essential to understand the basics. A screenshot, also known as a screen capture or screencap, is a digital image that captures the contents of your computer screen at a specific moment in time. Screenshots can be taken of the entire screen, a selected area, or individual windows and applications.
2. Taking Screenshots on Windows:
Windows offers several built-in methods for taking screenshots, each tailored to different needs and preferences. Here are some of the most common methods:
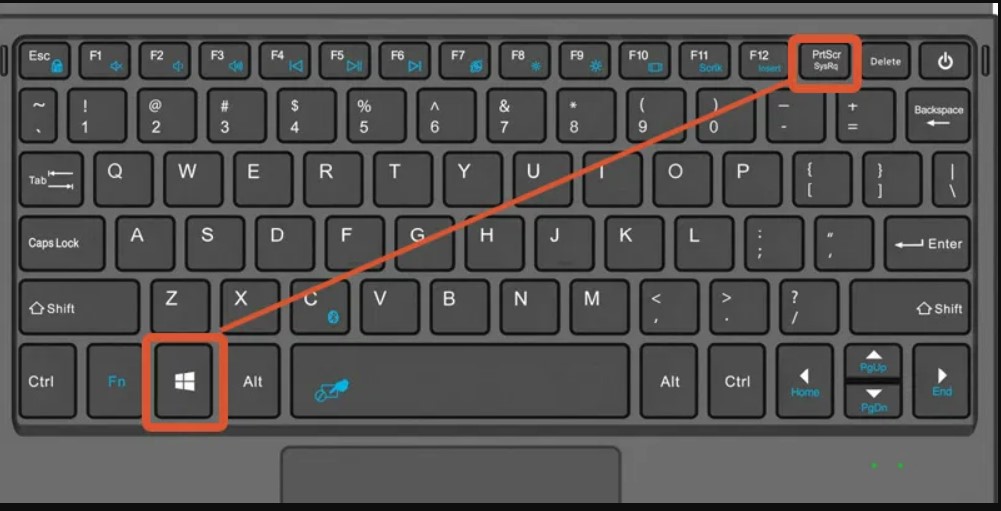
- Print Screen (PrtScn): Press the “Print Screen” key on your keyboard to capture a screenshot of the entire screen. The screenshot will be saved to your clipboard, and you can paste it into an image editing program (such as Paint) to save or edit it.
- Alt + Print Screen: Press “Alt + Print Screen” to capture a screenshot of the active window only. This is useful when you only want to capture the contents of a specific window without including the entire screen.
- Windows + Shift + S (Windows 10): Press “Windows + Shift + S” to open the Snip & Sketch tool, which allows you to select a portion of the screen to capture. Once you’ve selected the desired area, the screenshot will be copied to your clipboard, and you can paste it into an image editing program.
- Windows + PrtScn (Windows 8 and 10): Pressing “Windows + PrtScn” captures a screenshot of the entire screen and automatically saves it to your Pictures folder in a subfolder called “Screenshots.”
3. Taking Screenshots on macOS:
Similarly, macOS provides several built-in methods for taking screenshots, making it easy to capture and share content on your Mac. Here are some of the most common methods:
- Command + Shift + 3: Press “Command + Shift + 3” to capture a screenshot of the entire screen. The screenshot will be saved as a file on your desktop with a name like “Screenshot [Date] at [Time].png.”
- Command + Shift + 4: Press “Command + Shift + 4” to capture a screenshot of a selected area. After pressing the shortcut, use the crosshair cursor to select the desired area of the screen to capture.
- Command + Shift + 4 + Spacebar: Press “Command + Shift + 4 + Spacebar” to capture a screenshot of a specific window or application. After pressing the shortcut, click on the window or application you want to capture.
4. Advanced Techniques and Tips:
- Editing Screenshots: After capturing a screenshot, you can edit it using image editing software to crop, annotate, or enhance the image as needed. Popular image editing programs include Microsoft Paint, Adobe Photoshop, and macOS Preview.
- Saving and Sharing: Once you’ve captured and edited your screenshot, you can save it to your computer’s hard drive or share it with others via email, messaging apps, social media, or cloud storage platforms.
- Shortcut Keys: Memorizing and using keyboard shortcut keys for taking screenshots can greatly streamline the process and save time. Practice using the shortcuts regularly to become more efficient.
5. Troubleshooting and FAQs:
- File Size: Large screenshots can result in large file sizes, which may be impractical for sharing or uploading. Consider resizing or compressing screenshots before sharing them to reduce file size.
- Clipboard Issues: If your screenshots are not being saved to the clipboard or are not pasting into image editing programs correctly, try restarting your computer or updating your operating system to resolve any potential issues.
- Unsupported Content: Some applications or content may not allow screenshots to be captured due to copyright or security restrictions. Respect the terms of use and permissions of any content you capture to avoid legal or ethical issues.
6. Conclusion:
In conclusion, taking screenshots on PC is a simple yet powerful skill that can enhance your productivity, communication, and creativity. Whether you’re documenting important information, troubleshooting technical issues, or sharing moments of joy and laughter with friends, knowing how to capture and share screenshots effectively is an invaluable skill. By mastering the methods and techniques outlined in this comprehensive guide, you’ll be well-equipped to capture, edit, and share screenshots like a pro. So, start exploring, experimenting, and capturing the world around you one screenshot at a time!


