Mastering the Art of Transformation: A Comprehensive Guide on How to Convert Vector Graphics to Bitmaps in CorelDRAW
Introduction:
CorelDRAW, a powerful vector graphics editor, empowers designers and artists to create stunning visuals with precision and flexibility. While vector graphics excel in scalability and crispness, there are situations where converting them to bitmaps becomes essential. In this extensive guide, we’ll explore the intricacies of transforming vector graphics into bitmaps using CorelDRAW. Whether for web graphics, photo editing, or specific printing requirements, understanding the process of converting vectors to bitmaps is a valuable skill in the designer’s toolkit.
Section 1: Understanding Vector and Bitmap Graphics
- Distinguishing Vector and Bitmap Graphics:
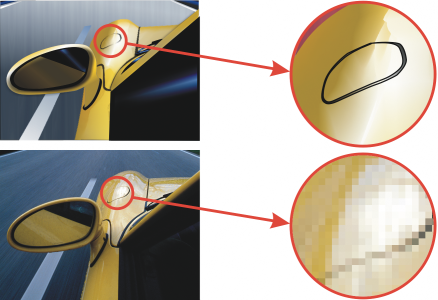
- Vector graphics are based on mathematical equations, allowing for infinite scalability without loss of quality.
- Bitmap graphics, or raster images, are composed of pixels and have a fixed resolution, making them ideal for detailed and high-resolution visuals.
- When to Convert:
- Convert vector graphics to bitmaps when specific effects, textures, or filters are needed that are better achieved in raster format.
- Bitmaps are suitable for photographic images, intricate textures, or when working with specific output requirements.
Section 2: Step-by-Step Guide on Converting Vector to Bitmap in CorelDRAW
- Open CorelDRAW:
- Launch CorelDRAW and open the vector graphic file you wish to convert.
- Select the Vector Object:
- Use the Pick tool to select the vector object you want to convert.
- Navigate to ‘Bitmaps’ Menu:
- Locate and click on the “Bitmaps” menu in the top toolbar.
- Choose ‘Convert to Bitmap’:
- Within the “Bitmaps” menu, select “Convert to Bitmap.” This prompts a dialog box with various options.
- Set Bitmap Options:
- Define the resolution, color mode (RGB or CMYK), and other settings based on your project requirements.
- Higher resolutions are suitable for print, while lower resolutions may be sufficient for web graphics.
- Select Background Type:
- Choose between maintaining a transparent background or selecting a specific color for the background.
- Choose Anti-Aliasing:
- Enable anti-aliasing for smoother edges in the bitmap image, especially when dealing with curves or diagonal lines.
- Click ‘OK’ to Confirm:
- After configuring the settings, click “OK” to apply the conversion. The vector object is now transformed into a bitmap.
- Adjust Bitmap as Needed:
- Use the bitmap editing tools in CorelDRAW to make additional adjustments, such as cropping, resizing, or applying filters.
Section 3: Advanced Techniques and Considerations
- Bitmap Tracing:
- CorelDRAW offers a powerful bitmap tracing feature that converts bitmap images back into vector graphics for further editing and manipulation.
- Preserving Vector Elements:
- Before converting, duplicate the vector object or save a copy to preserve the original vector graphic for future edits.
- Resolution Considerations:
- Be mindful of the intended use of the bitmap image. Higher resolutions are crucial for print, while web graphics may require lower resolutions for faster loading times.
- Color Modes:
- Ensure that the chosen color mode aligns with the project requirements. RGB is standard for digital displays, while CMYK is suitable for print.
Section 4: Practical Applications and Use Cases
- Web Graphics and Social Media:
- Convert vector logos or icons to bitmaps for faster loading times on websites or social media platforms.
- Texture Mapping in 3D Design:
- Bitmaps are often used for texture mapping in 3D design software. Convert vector textures for realistic surface rendering.
- Photo Editing and Manipulation:
- When integrating vector elements into photos, converting them to bitmaps ensures seamless blending and realistic visual cohesion.
- Print Design and Publications:
- Bitmaps with high resolutions are essential for print publications. Convert vector illustrations to bitmaps for inclusion in brochures, magazines, or posters.
Section 5: Best Practices and Tips
- Maintain Original Vectors:
- Always keep a copy of the original vector graphic to preserve the ability to make edits without loss of quality.
- Experiment with Settings:
- Explore different resolution and color mode settings to find the optimal configuration for your specific project.
- Bitmap Tracing Precision:
- When using bitmap tracing, adjust the precision settings to achieve the desired level of detail in the resulting vector.
- Regularly Save Progress:
- Save your work regularly, especially before making significant changes, to prevent loss of data.
Conclusion:
Mastering the art of converting vector graphics to bitmaps in CorelDRAW is a valuable skill for designers and artists. Whether for web graphics, print design, or intricate textures in 3D modeling, understanding the process empowers creatives to achieve their visual objectives with precision and flexibility. By following this comprehensive guide and experimenting with the various settings and techniques, designers can seamlessly integrate the strengths of both vector and bitmap graphics to bring their creative visions to life.