Mastering the Rebirth: A Comprehensive Guide to Performing a Clean Install of Windows 10
Introduction
As technology advances and systems evolve, performing a clean install of an operating system becomes a fundamental skill for users seeking to rejuvenate their devices, eliminate clutter, and ensure optimal performance. In this detailed guide, we will explore the significance of a clean install, delve into the mechanics of the process, and provide a comprehensive step-by-step tutorial on how to perform a clean install of Windows 10. Whether you’re experiencing performance issues, planning to upgrade your hardware, or simply aiming for a fresh start, this guide will equip you with the knowledge to embark on a transformative journey for your Windows 10 system.
Understanding the Significance of a Clean Install
Performing a clean install of Windows 10 holds several key advantages, addressing common issues and providing users with a fresh and optimized computing environment. Key aspects that highlight the significance of this process include:
- Eliminating System Clutter: Over time, a Windows system may accumulate unnecessary files, outdated drivers, and residual registry entries. A clean install removes this clutter, promoting a streamlined and efficient computing experience.
- Resolving Performance Issues: If your system is exhibiting sluggishness, crashes, or other performance issues, a clean install can often resolve these problems. It eliminates software conflicts, corrupted files, and other issues that may be hindering performance.
- Upgrading Hardware Components: When upgrading or replacing hardware components such as the hard drive or motherboard, a clean install ensures that the operating system is properly configured for the new hardware, preventing compatibility issues.
- Enhancing Security: A clean install helps eliminate any malware or persistent threats that may have infected the system. It provides a fresh start with updated security features, reducing the risk of potential vulnerabilities.
- Preparing for Software Development: For developers or users involved in software development, a clean install provides a pristine environment for setting up development tools, SDKs, and other essential components without interference from existing configurations.
Now, let’s delve into the comprehensive step-by-step guide on how to perform a clean install of Windows 10, ensuring a smooth and effective process.
Step-by-Step Guide: Performing a Clean Install of Windows 10
Important Note: Before proceeding with a clean install, ensure that you have backed up all essential data from your system. A clean install will erase all existing data on the target drive.
- Create a Windows 10 Installation Media:
- Visit the official Microsoft website and download the Windows 10 Media Creation Tool.
- Run the tool and select “Create installation media for another PC.”
- Choose the language, edition, and architecture for Windows 10. Create either a USB flash drive or an ISO file.
- Prepare Your System:
- Insert the USB flash drive with the Windows 10 installation media or mount the ISO file.
- Restart your computer and enter the BIOS/UEFI settings. Change the boot order to prioritize the USB drive or DVD drive (depending on your installation media).
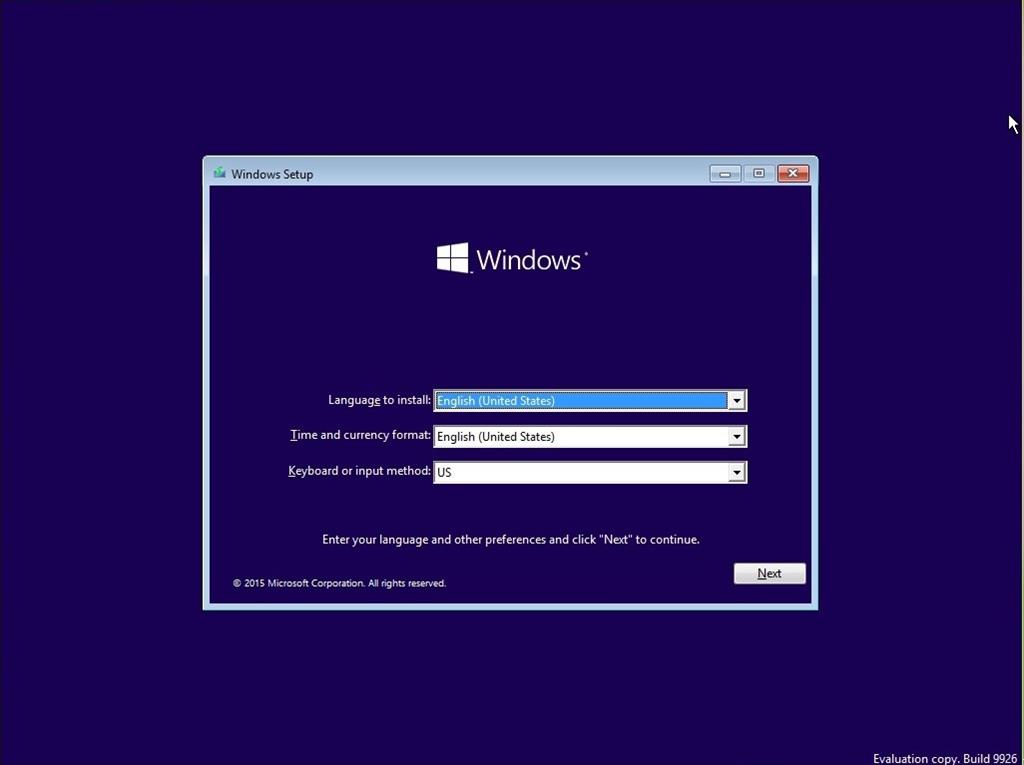
- Begin the Windows 10 Installation:
- Boot from the installation media, and on the Windows Setup screen, select your language, time, and keyboard input preferences. Click “Next.”
- Click “Install Now.”
- Enter Product Key:
- Enter your Windows 10 product key when prompted. If you don’t have one, you can choose to enter it later. Click “Next.”
- Accept License Terms:
- Read and accept the license terms. Click “Next.”
- Choose Installation Type:
- Select “Custom: Install Windows only (advanced).”
- Choose the drive where you want to install Windows 10. If you’re replacing the existing installation, select the drive and click “Next.”
- Begin the Installation:
- Windows 10 will begin the installation process. This may take some time.
- Set Up Your System:
- Follow the on-screen prompts to set up your region, language, keyboard layout, and other preferences.
- Create or sign in with a Microsoft account. You can also choose to create a local account.
- Configure Settings:
- Customize your settings, including privacy options. Click “Next.”
- Complete the Installation:
- Windows 10 will finalize the installation and set up your desktop environment.
- Install Device Drivers and Updates:
- After the clean install, it’s crucial to install device drivers for your hardware components. Visit the manufacturer’s website for your PC or individual components to download the latest drivers.
- Run Windows Update to ensure that your system is up to date with the latest security patches and updates.
Advanced Features and Tips:
1. Backup and Restore:
- Before initiating a clean install, create a full backup of your important data using tools like Windows Backup, File History, or third-party backup solutions.
2. Driver Management:
- Download and store the latest device drivers for your hardware on a separate drive or USB. This ensures that you have them readily available after the clean install.
3. Custom Partitions:
- During the installation, you can create custom partitions on your drive. This allows for a more tailored storage configuration, separating the system files from personal data.
4. Activation Troubleshooting:
- If you encounter activation issues after the clean install, use the troubleshooter in Settings > Update & Security > Activation to resolve any activation problems.
5. Reset This PC vs. Clean Install:
- Windows 10 includes a “Reset This PC” feature, but a clean install offers a more thorough and complete refresh of the system.
6. Windows Update Troubleshooting:
- If Windows Update encounters issues, you can use the Windows Update Troubleshooter to identify and resolve problems related to updating.
Real-World Applications and Benefits:
- Optimizing Gaming Performance:
- Gamers can benefit from a clean install to ensure optimal system performance, reducing background processes and potential conflicts that may impact gaming experiences.
- System Maintenance and Longevity:
- Regular clean installs contribute to system longevity by preventing the accumulation of unnecessary files and ensuring that the operating system functions at its best.
- Preparing for Hardware Upgrades:
- When upgrading hardware components, performing a clean install helps prevent compatibility issues and ensures that the system is configured for optimal performance with the new components.
- Security Enhancements:
- A clean install removes any lingering malware or threats, enhancing the security posture of the system and reducing the risk of vulnerabilities.
- Streamlining Development Environments:
- Developers benefit from a clean environment, free from conflicting configurations, making it easier to set up development tools and environments.
Future Developments and Updates:
As Windows 10 continues to receive updates and improvements, Microsoft may introduce new features and enhancements to the installation process. Stay informed about system updates to benefit from the latest advancements in clean install procedures.
Conclusion:
Performing a clean install of Windows 10 is a transformative process that revitalizes your device, providing a fresh start and optimizing performance. By following the comprehensive guide and exploring the tips and advanced features outlined in this overview, users can confidently embark on the journey of rejuvenating their Windows 10 system. As technology evolves, the clean install process remains a fundamental practice for maintaining a healthy and efficient computing environment. Embrace the benefits of a clean slate, and let your Windows 10 system thrive in its renewed state.


